
Go to... | Start A New Topic | Search | Notify | Tools | Reply To This Topic |
| Camera Cable Routing | Login now/Join our community |
Mild out today - had a chance to check out the camera cable at the rear of the coach for possible reuse with planned new camera system - insulation broken and cracked to point of non repair. Best to run new cable underneath and go up through rear wall of coach and in the front up beside the front window. Is this a good plan? - has anyone done this? What about other routing? Difficulties? Comments would be appreciated Thank you Clint | |||
|

 |
...why not this: http://www.tadibrothers.com/Ca...ted-RV-Backup-Camera _________________________ The 82 MCC {by Barth} is not an rv-- it is a Motor Coach!! | |||
|
 3/11 3/11 |
Might ask Nick about cables as he pulled down his entire ceiling. The cables run along the sides above and behind the cabinets and they might be anchored. He might know. 1993 32' Regency Wide Body, 4 speed Allison Trans, Front Entry door, Diamond Plate aluminum roof & 1981 Euro 22' w Chevy 350 engine and TH 400 tranny | |||
|
Thanks guys I am getting a sinking feeling that routing a new cable is going to be a horror show. I will bet that no member has been able to access a route without extensive wall/ceiling dissection. Doug- you suggest wireless but posts on wireless in metal coaches are not positive for interference. Do any of our members use wireless and what are the results? Thanks Clint | ||||
|
Captain Doom |
I would drop it down the back bulkhead then run it along the frame rails to the dash. Rusty '94 28' Breakaway: MilSpec AMG 6.5L TD 230HP Nelson and Chester, not-spoiled Golden Retrievers Sometimes I think we're alone in the universe, and sometimes I think we're not. In either case the idea is quite staggering. - Arthur C. Clarke It was a woman who drove me to drink, and I've been searching thirty years to find her and thank her - W. C. Fields | |||
|
9/09 |
I have now run two camera cables from the back. Both cables enter at the top behind the camera using a properly sized grommet. Then it goes below the floor of the cabinets above the bed to the right rear corner cabinet. Then it goes down the inside of the cabinet, hidden on the inside corner. The biggest problem was drilling through the floor of the cabinet but once done I made a bulkhead with PVC fittings and aluminum sheet anchored to the cabinet underside above where the batteries are. I then caulked the feed through and ran the cable along the frame with all the other cables, wires and tubes. I did encase each cable in black convoluted tubing purchased from radio shack, Lowes, etc. They then run up just behind the front of the coach and enters into the space under the dash through the firewall with all the other cables and wires. From there they go to the appropriate switcher, monitor, etc. I have two rear camera because the replacement color cameras do not have as wide a view as the original B&W camera. The first camera views from the bumper to about twelve feet out. The second camera, mounted above the first, views from about fifteen feet out to well above the horizon. I use the second camera while driving and backing until I am close to the back of the site. Then I switch to the lower camera to know when to stop. I hope this is of some help to you. Lance & Sue Walton Previous owner of a 1993 38ft Regency Cummins 6CTA8.3 300HP Allison MD3060 Transmission Spartan Chassis Loveland, CO | |||
|
 |
After having the ceiling out of mine, I can say it would be impossible to pull a new wire the length of the coach. The wires are not pulled in a straight line and trying to pull a wire thru all the sharp edged holes in the roof rafters would shred and cut the new wires. Nick | |||
|
Thanks to all who posted. Lance I think I will use your procedure. A few questions please. Did you locate your monitor to the dash from the factory overhead location? If you went to the overhead, how did you get up the sidewall by the driver's window? If you went to the dash, what did you use to occupy the space vacated by the overhead monitor? ( I was maybe thinking of a weather station of some sort) Thanks Clint | ||||
|
| 9/09 |
I had originally mounted them just above the dash using some speaker mounts that are adjustable. That didn't work great however. Now they (I have three monitors) are mounted to the visor since I had never really used it as a visor. I made a mount out of aluminum and strapped it to the visor with webbing and velcro. The cables go up the post at the front left of the coach that is the left side of the front window. There is an opening that is accessible from under the dash. Your dash should have a removable panel on the top. If not it could be difficult to reach the hole. From the hole it goes up the inside of the post and into the cabinets at the left front. They then go across at the back of the cabinets and exit where the television mounts. In my coach I have removed the original TV and mounting. I reused some wood salvaged from elsewhere in the coach and made a slide out for the TV. That arrangement provides a perfect spot for the cables to exit and run to the visor. To prevent the visor from drooping or swinging I used a curtain mount to hold the free end in place. When I get a chance I will take some photos and post them. Having them mounted above like they are makes them very easy to see without distracting from seeing what is ahead of me. The only downside is that they do block seeing traffic lights while stopped at an intersection. I need to lean a little to the right to see them. It is a minor problem. Lance & Sue Walton Previous owner of a 1993 38ft Regency Cummins 6CTA8.3 300HP Allison MD3060 Transmission Spartan Chassis Loveland, CO | |||
|
| 9/09 |
I forgot about what I did with the original monitor mounting position. It was originally mounted on top of the dash nearly centered on the coach width. I see that many coaches have the same arrangement. I used more of the salvaged wood and made a nice platform. I will photograph that as well. Lance & Sue Walton Previous owner of a 1993 38ft Regency Cummins 6CTA8.3 300HP Allison MD3060 Transmission Spartan Chassis Loveland, CO | |||
|
 7/16 7/16 |
I have a Voyager wireless camera / monitor set up and it works well. My old black and white went out last year while on the road south,so I stopped at a camping World.They are not cheap but I couldn't go without as I like to make sure the tow vehicle is still there and also a great aid for lane changes when passing.Camera hooked up to 12v source at rear and monitor has a 12v plug to socket in overhead cabinet above driver seat.Mounted it in same place as old unit.six inch color screen is nice 1995 Regal 31 Ft. Ford F 53 Chassis 460 EFI | |||
|
| 9/09 |
Sorry for the delay but I have been fighting my computer and I think it is ahead on all cards. I had to install a new hard drive and go through all the installs, 3 times. It is now up and running, I hope. Here are the photos: 2 new back-up cameras: 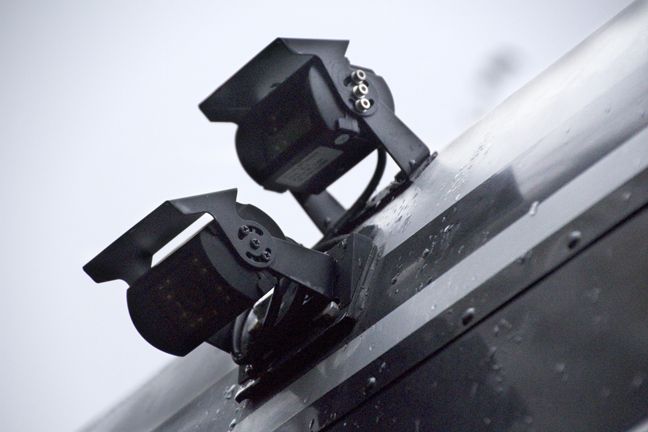 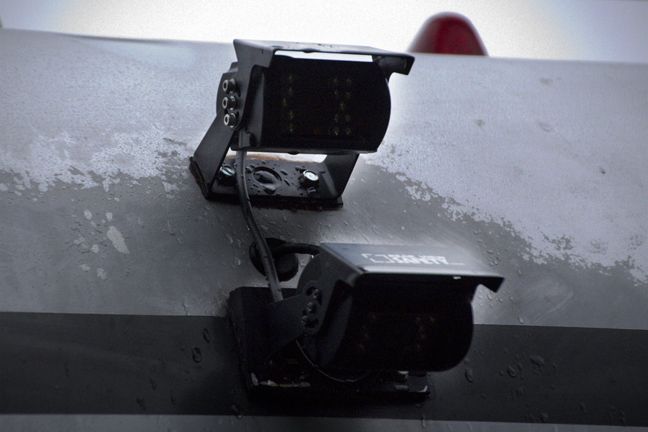 Cables running through the cabinets over the bed:  Cables coming into the vertical cabinet next to the bed.  Cables going down through the bottom of vertical cabinet.  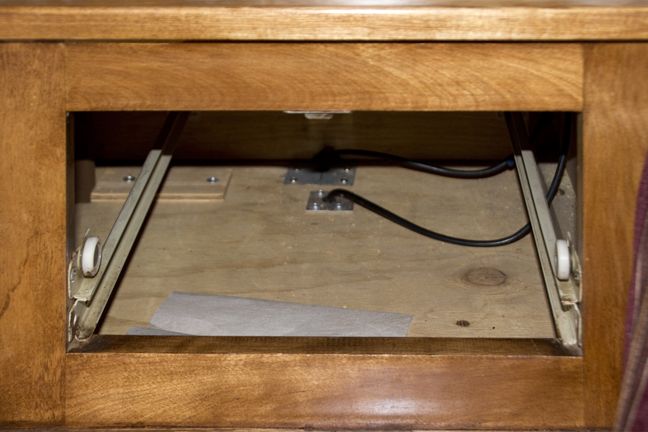 Bulkheads under the cabinet and above the batteries. This is where they start their route to the front. 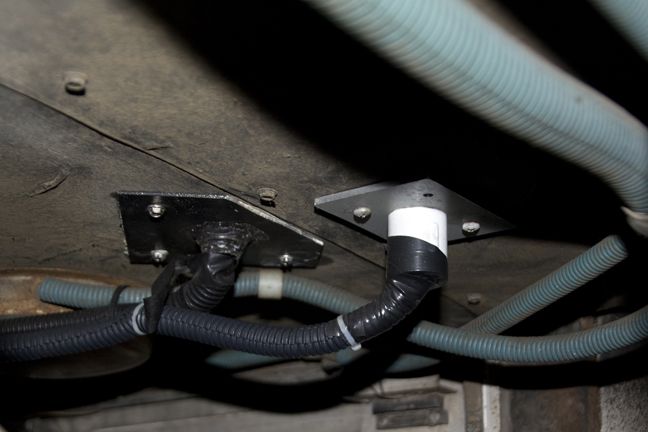 There was no way to document the entry of the cables into the front of the coach but here is the switcher mounted under the center console.  Here are the cables exiting the cabinets over the dash.  Here are the three monitors mounted to the visor. 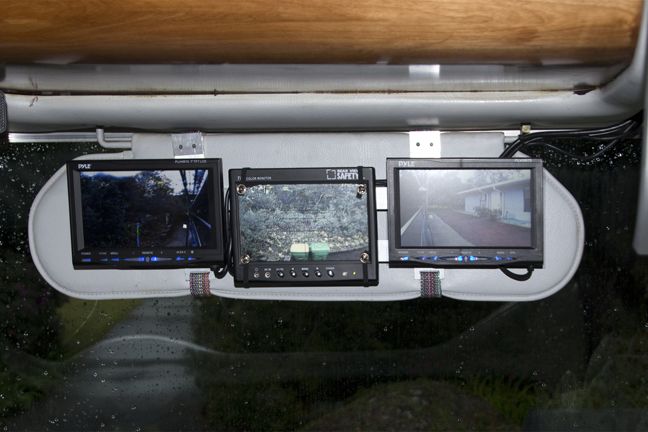 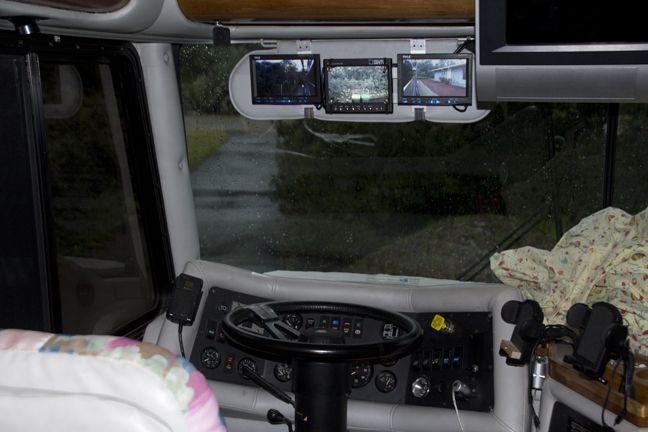 Here is the platform I made for the top of the center console where the old monitor was mounted.   What I am showing here is that the cup holder is detachable to allow cable routing.  Here is the bottom of the cup holder showing the slotted holes. By adjusting the screws appropriately the holder can be tightly secured.  This is the switch I added to the dash to switch between back-up cameras.  I hope this is all of some help. Lance & Sue Walton Previous owner of a 1993 38ft Regency Cummins 6CTA8.3 300HP Allison MD3060 Transmission Spartan Chassis Loveland, CO | |||
|
| Official Barth Junkie |
Wow, nice installation! The photos are great, thanks for fixing the links. 9708-M0037-37MM-01 "98" Monarch 37 Spartan MM, 6 spd Allison Cummins 8.3 325+ hp | |||
|
| 3/19 |
DITTO | |||
|
Lance: The pictures are great. Thank you. I will use the same cable routing as you in the rear and use the original monitor location in the front. On my coach, it is located overhead above the driver seat. I can only use a 5.6 unit due to space considerations. One thing though - are all the new cameras currently available limited in their angle of view? You would think that technology would improve the situation, not make it worse. Also your write up mentions switching from one camera to the other. You have three monitors so I assumed a monitor for each one - no switching required. What is the third monitor for? Clint | ||||
|
| Powered by Social Strata |
| Please Wait. Your request is being processed... |
This website is dedicated to the Barth Custom Coach, their owners and those who admire this American made, quality crafted, motor coach.
We are committed to the history, preservation and restoration of the Barth Custom Coach.
We are committed to the history, preservation and restoration of the Barth Custom Coach.