Go to... | Start A New Topic | Search | Notify | Tools | Reply To This Topic |
| My Buy | Login now/Join our community |
"Host" of Barthmobile.com 1/19 1/19 |
I've got one too. It's electric, I have no propane on my coach. All of my heaters are electric baseboard.
| |||||||||||||||
| ||||||||||||||||


 |
I'm in the midst of the interior renovation, and then, on ebay, up came 6 tickets for $100, for the last "Bat Day" in the last year that the "House that Ruth Built" will be standing in the Bronx, NY. I figure my boys have to see this place before it is demolished. The legends of the game called this place home. For reasons I don't understand, the earlier owners had 3 isolators in the electrical system. One was missing and the cables bolted together, one was not working, and one I still am not sure of, it is a small mechanical unit adjacent to the alternator. I bought a new Sure Power unit and wired it in, and during my final check out before powering up, I realized I have the first year of the alternator system which uses an external sense line, so I needed a different Sure Power unit. I quickly checked Ebay and Craigslist (it was a Sunday, no stores open) and only one was found in the US, and it was 6 miles away. I won't rule out divine intervention. I installed it. I had also had some new battery cables made up so I could go straight from the coach battery to the starter without first passing through some bolted cable junctions. The engine starts better now. The wiring I did, and the wiring I cut out, and the new isolator have provided the proper functionality of the system. At this point, the floor is plywood, yet we went to Croton Point Park, 30 miles north of NYC anyway. In the prior week, I also finally installed a 125/250V 50A inlet for the rig. Someone had pilfered the one prior to me getting this at auction. I have never had the thing powered by shore power before. When I connected at the park, all was well. I didn't run the AC for long, I want to do a better checkout in more controlled circumstances. I did bring some window fans that helped. Outside the park, the Metro North rail station allows for easy access to NYC. We took the boys to Times Square, the top of the Rockefeller Center building, the Museum of Natural History, and Yankee Stadium. Great weekend getaway! On the way back, on I-84, in CT, a deer ran in front of the pickup I was following, in the middle lane. The pickup got loose, and the deer went down. I was doing the speed limit, 65, and there were vehicles all around me. I hit the brakes hard, and boy oh boy did this P32 chassis work well. I think as the deer popped up again and ran in front of me, I was down to 35. I instantly thought about my new radiator, going to get creamed, and I was thinking that a new windshield is probably going to cost a thousand bucks. And then the deer ran away. I told the mechanics that replaced the brake system that everything they did worked perfectly, no pulling to one side, no lockup, and gave them some donuts for their break. This was the longest trip I've taken so far. With this, I am able to confidently say that I am getting 4 MPG from the Quadrajet. The carburetor looks older than the rest of the engine, if that means anything. The number on it is right, 17085212, but there is a rebuilder sticker carb, teflon tape on the fuel inlet threads, initials in magic marker on the secondary butterfly, the bushings for the secondary throttle shaft seems loose, and I'm thinking it is time to replace this carb. It has been sitting a long time before I got it, so perhaps some gaskets have trouble, maybe the float is sinking too low with seepage, maybe there are other leaks internally dripping fuel in to the manifold. It ran great, giving me torque to pass while going up hills on the highway when the tractor trailer rigs slowed to 40. But 4 MPG, that is a killer! Holley markets rebuilt Q-jets, and the right one is 64-70113 for $400 at Autozone, or they also say the 65-1904 is good for all engines from the 305 to the 454, for $325. I like the right carb, rather than the "one size fits all". Some rebuilders with decades of experience will sell the carb for for around $250-$350 on ebay, and I also found a seller with an NOS AC-Delco carb for over $800, a little rich for my blood. Anyway, the boys got their bats, and the Yankees won. We saw Johnny Damon get a triple on the day after he became the first Yankee to go 6 for 6 in the Stadium. We saw Joba throwing 99 MPH heaters! So, for now, Matt 1987 Barth 27' P32 Chassis Former State Police Command Post Chevrolet 454 Weiand Manifold, Crane Cam, Gibson Exhaust | |||
|
|
3 of the 4 new shocks are in. My oil pressure gauge, the stock P30 dashboard one, crapped out, and stuck at 60 PSI. That was motivation for me to begin acquiring VDO gauges and replacing the dashboard. I got several fuel gauges with the kits I got, and one had a new tank sender. I figured I'd drop the tank and see if the sender could be mounted. Well, that, and I wanted to inspect the fuel connections there. The VDO sender is meant to be used in a way that means there would be a separate fuel line; the Barth setup looks like a GM solution, with integrated fuel lines and sender wiring on one fixture point. I will go with the display gauge that works with the stock sender. But I was happy to get the tank down, there was about 3 feet of cracking, brittle fuel line. Probably it would wait until I was in Death Valley at 130F to fail on me. The dashboard is "interesting", with wiring from GM, Barth, and a couple police agencies. There is one switch labeled "CLNS. LTS." which is normally on, do you know what that is? There is one switch labeled "AUX START", which is normally off. That is separate from the Generator start button, and the dashboard engine start. What is that? There are 2 accessory switches, with no wiring to them. So I'll be putting together the gauges, radios, and dashboard now. I will put in some additional 12v accessory outlets to keep my wife and kids happy. Does anyone have the wiring diagram for a 1986 P30? I'd specifically like to know what color the wires are for the high beam indicator, the brake light indicator, the fuel tank indicators. I got a new carburetor on the 454. Anyway, happy motoring! Matt 1987 Barth 27' P32 Chassis Former State Police Command Post Chevrolet 454 Weiand Manifold, Crane Cam, Gibson Exhaust | |||
|
 |
Matt, The "CLNS. LTS." switch is used to blink the clearance lights when they are on to signal a truck it is clear to move over. The "AUX START" switch connects the house batteries to the coach batteries to help start the engine in case of a low battery. I also have two switches with no label and they are not connected or wired at all. Keep thinking of something I might use them for but haven't come up with anything yet. Nick | |||
|
| 8/11 |
Matt, Call Me tmrw morning and I will log into the Workhorse website to see if the wiring diagrams are online. If they are I will d/load what you need and email it to you. Billy T Billy & Helen Thibodeaux Retired from Billy Thibodeaux's Premiere RV, Inc. Scott, LA 70583 I-10 Exit 97 The Farm is near Duson, LA I-10 Exit 92 then N 1 mile on right Three Full 50 Amp RV Hookups ! billynhelen@me.com Data Tag: 9404-3908-36XI-2C 1994 Sovereign 36' Widebody on Spartan IC (Mountain Master Lite) Chassis. Powered by Cummins ISL9-450 Onan 8,000 Quiet Diesel Genset Toad: 2018 Chevy Colorado ZR2 Diesel with M&G Car Brake  | |||
|
|
Nick, Thanks for your info on the "Aux Start". I assume then that this explains one of the switched isolators I took out. It had failed, and was shorting together the 12V systems. I couldn't figure out why it was there. Oh, you want a "laugh"? I was working on the dashboard, I figured it would be time to get the dashboard AC working. I knew there were loose wires to the control unit. I finally hooked them up. I figured the AC wouldn't work anyway, at a minimum, it would need a charge. So I focused on finding the charge point. I didn't find it, I was looking for the AC system hoses. I didn't find them, and suddenly it dawned on me, "where the heck is the AC system compressor!?!?!?!?!?" I didn't mind the Delco radio missing, and the shore power connector missing, and the fridge missing, but, this really got me laughing at myself for not noticing this before. Even as I have been running new wires and cables past the engine, it never dawned on me! Matt 1987 Barth 27' P32 Chassis Former State Police Command Post Chevrolet 454 Weiand Manifold, Crane Cam, Gibson Exhaust | |||
|
|
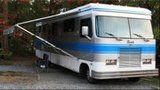
Here's some pictures about a window upgrade project. It didn't feel right to be taking a sawzall to the Barth, but I knew it was for a better outcome. This shows the stock windows from Hehr. They were small I guess so the K9s wouldn't get too upset when traveling. 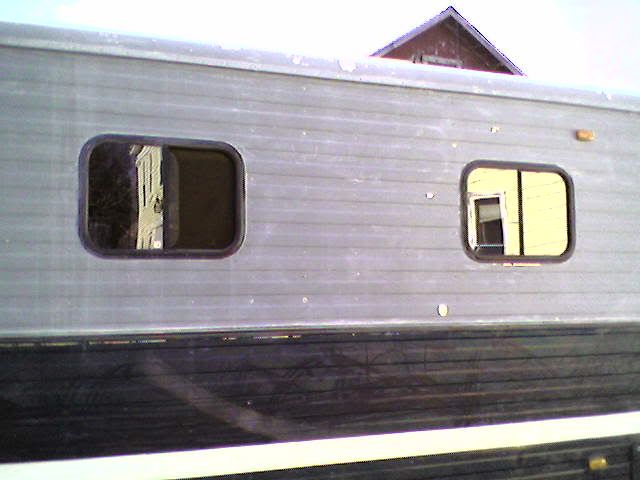 This shows the inside wall with the inner trim ring of the windows removed, and the paneling removed. The window trim ring is held in place with philips head screws, the paneling was riveted in place. 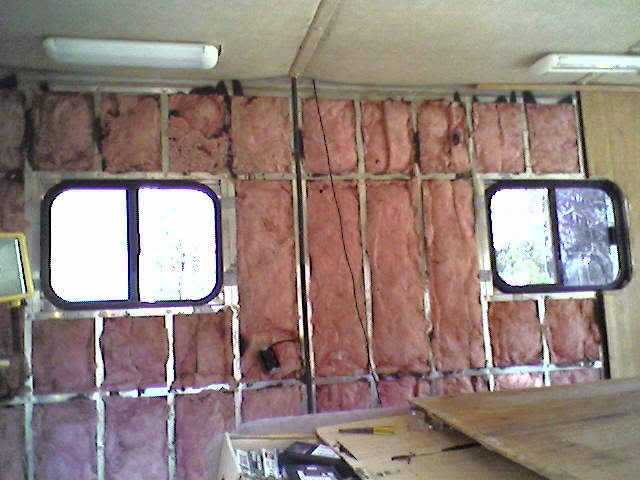 This shows the outside after the cuts were made. I made a template from cardboard, and traced around the inside of the new window with the trim ring removed. I used the cardboard to draw the outline on the skin of the Barth. I selected a window width that would fit snug to the verticle aluminum beams in the wall, 28". I had to cut some beams in the process. I had to remove the beam that was supporting the weight of the old windows. About 4" below where my new windows came in, there is another horizontal beam. I cut a 2x4 to fit here to support the weight of the window, and notched it with a table saw to clear the geometries of the dashboard. 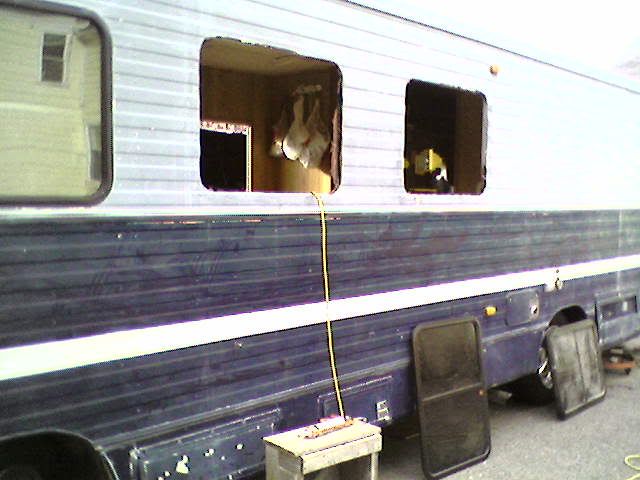 One of the Hehr windows is a conventional slider, the other is a slider with red handles on the inside to allow for easy egress in an emergency. Here is the outside, with the new windows in place. 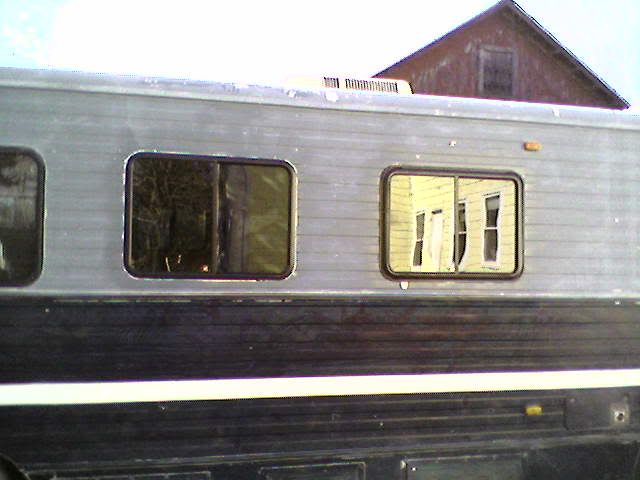 I didn't get the knack of placing the window sealant with a caulking gun. With the corrogated aluminum, I was either getting too much or too little placed. So generally I used too much and then cleaned off the excess with mineral spirits. Here is the inside. 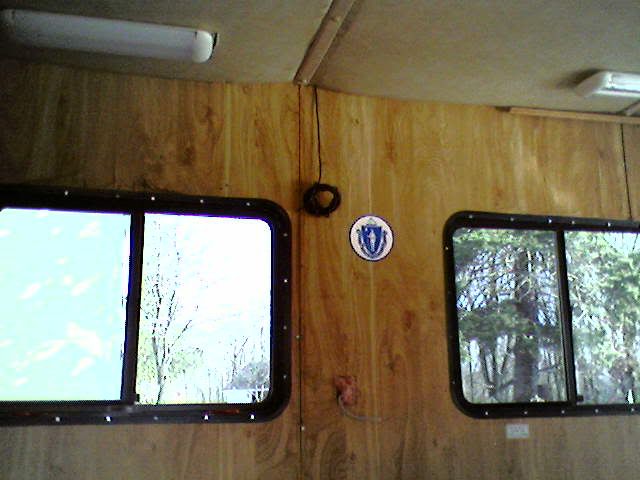 I was happy to keep the state seal in place. On the inside, the cut out for the trim ring is a bit larger than the cut out for the window. I used hex head self tapping screws to affix the trim ring to the windows. That is what Home Depot had, I would have prefered philips head. I had a very tight fit between the outside of the socket I was using to drive the screws and the trim ring. But bad weather was coming and I had to get the windows in after having cut the holes in sunshine. Matt 1987 Barth 27' P32 Chassis Former State Police Command Post Chevrolet 454 Weiand Manifold, Crane Cam, Gibson Exhaust | |||
|
|
But wait, there's more! I mixed and matched some sets of VDO gauges from ebay. By doing so, I came in at around $10 per gauge, including for the speedo and tach. Since the time of the picture taking, I have filled one hole with a transmission temperature gauge. I bought a VDO fuel gauge to work with the stock GM sender in the fuel tank. Be careful, VDO makes gauges to work with many different types of senders. I was watching the sets on Ebay from VDO and Autometer, and would have used either. I am glad I went with VDO, there are so many gauges and types available. I have since also gotten a matching VDO clock originally in a Volvo. I liked the imitation wood grain paneling that Barth used on one of the office wall dividers I took down, and used that for my dashboard. 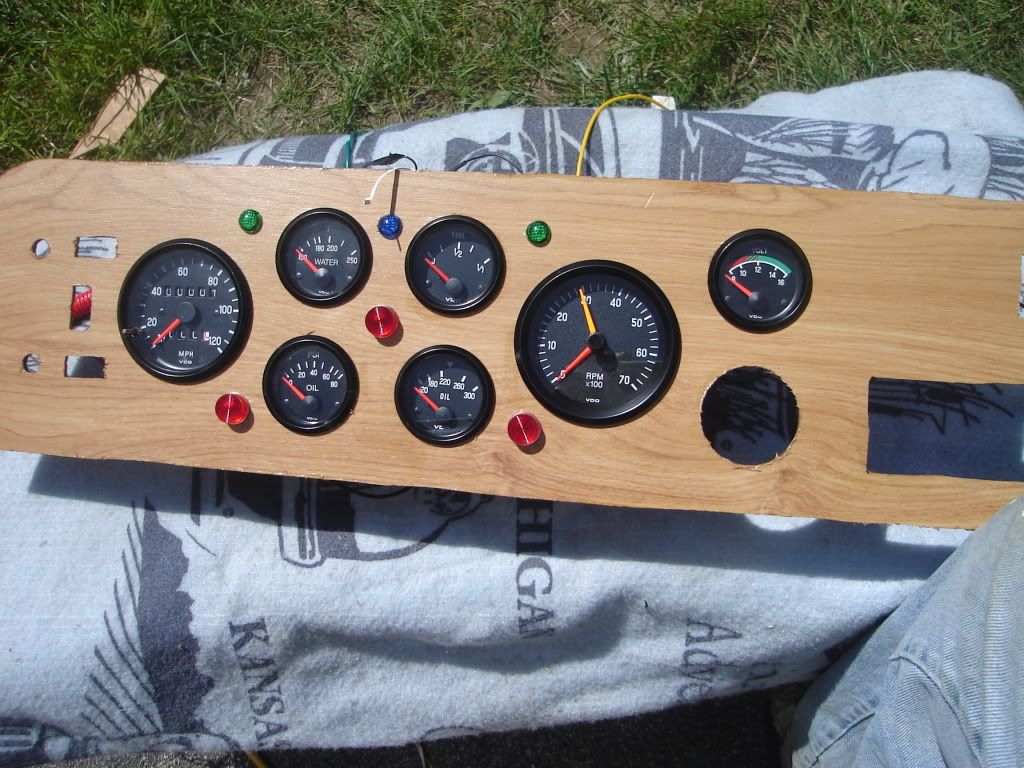 Since someone absconded with the Delco radio from the old dashboard, I added a shelf for the new radio with the DIN style attachments, a Jensen unit from Target with an Ipod interface. Above the radio position, I added a power outlet from Radio Shack to power my wife's Ipod.  The indicator lights are from Radio Shack and Autozone. I have a cutout position for mounting the GM AC/heater controls.  It quickly became a rats nest of wires but I'd bought plenty of colors to allow me to easily differentiate what is what. I used green and black for separate ground lines, which then tied in to a ground bus bar on the framework holding the steering column in place. VDO advised that care be given to the grounding to ensure optimal performance of the gauges. It had been many years since I'd done any electronic hobby stuff, and I was surprised of the dirth of supplies from Radio Shack, auto electronics stores, and electronics supply stores. If you do a dashboard, go to www.digikey.com first and buy yourself some mate-n-lock connectors for a wire harness interface. I used a marine urethane on the backside of the wood dash to protect against vapor damage. I am going to add a SPDT switch adjacent to the voltmeter, so I can monitor either the coach or the house batteries. I used the stock Barth dashboard as a guide when layout out the gauge positions. I like the positions I chose, but on the P30 chassis, well on mine at least, the stock GM gauge cluster was not centered on the steering wheel, it was shifted to the left. I think this was done so that the speedo drive cable would not interfere with the brackets supporting the steering wheel. I thought of centering my gauges more, but I didn't want to find out that I'd run in to problems with a noisy speedo cable if it had to negotiate some acute angles. Matt 1987 Barth 27' P32 Chassis Former State Police Command Post Chevrolet 454 Weiand Manifold, Crane Cam, Gibson Exhaust | |||
|
|
Oh Gosh Darn! Last summer, my AC bracket broke. I finally found another "7N4" AC bracket from a guy parting an RV, and went to install this. http://barthmobile.com/groupee...n_7N4%255B1%255D.pdf If you look at that .pdf file, you'll see a drawing of the bracket and the mounting bolts. I found that in addition to the bracket breaking, a bolt broke also. The bolt that is lowest and furthest to the right in the drawing broke. So I have the remains of what I am assuming is a grade 5 3/8" bolt in the driver side cylinder head. It is recessed about a 1/16th". I tend to think I won't be using the AC this year. To get a clear shot at the bolt with a drill, I'd have to probably yank the radiator and loosen the hydroboost pump. Either that, or yank the head. Like I said, oh gosh darn. I figure that I have only one chance to drill the bolt and get an EZ out in. But, does anyone have any ideas or suggestions? thanks, Matt 1987 Barth 27' P32 Chassis Former State Police Command Post Chevrolet 454 Weiand Manifold, Crane Cam, Gibson Exhaust | |||
|
FKA: noble97monarch 3/12 3/12 |
Since it sounds like the bolt is just to attach the bracket, could you use another bolt in the area and redesign a slightly different bracket.  Formerly: 1997 Barth Monarch Now: 2000 BlueBird Wanderlodge 43' LXi Millennium Edition DD Series 60 500HP 3 stage Jake, Overbuilt bike lift with R1200GS BMW, followed by 2011 Jeep Wrangler Unlimited, “I haven’t been everywhere, but it’s on my list.” | |||
|
| 7/17 |
The one suggestion that I have is based on the fact that the bolt broke because of a broken bracket and is not because it was stuck. I would cut a slot in the bolt with a dremmal 1" cut off blade, spary with PB Blaster it for a week or two and flat blade screwdriver it out. If you cut in the center and this does not work, cut at 90 deg. and use center of x for drill center. Best of luck 1986 31' Regal -1976 Class C 454/T400 P30 -350/T400 G30 twin cntr beds - 21' rear bath | |||
|
|
I never posted this picture. 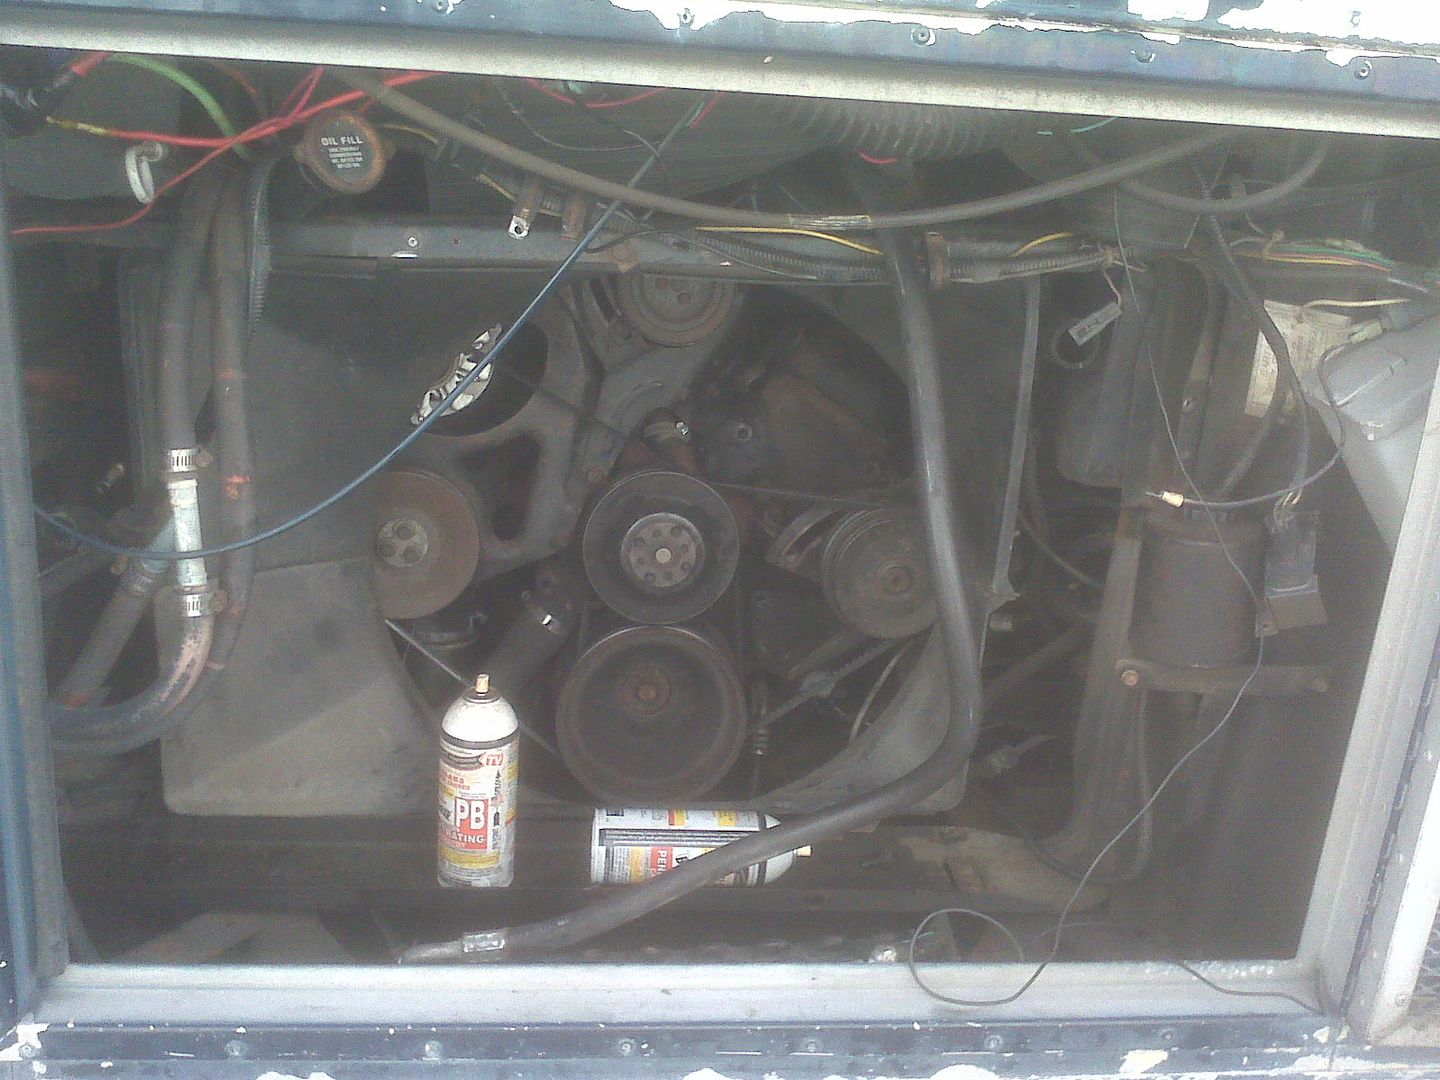 I handed the problem to my mechanic. Bolt? $2. Access to bolt? More than $2. That is the front of a 1987 Chevrolet P30 with a 454 in an RV chassis. The center pulley is the water pump. The bottom pulley is the crank, and going clockwise as viewed from the front, we have an AIR pump, an alternator (the shiny item), another AIR pump, a void where the AC compressor goes, and the hydroboost pump. Note that the hydroboost pump has a 2 groove pulley but in this image only one belt is in place. There are two there now. You can see the hole from where the bad bolt was removed, there on the driver side cylinder head, slightly above, and even with the right side of the water pump pulley. In hindsight, should I have thrown in a cam and an Edelbrock manifold while the front of the engine was accessible? happy motoring! Matt 1987 Barth 27' P32 Chassis Former State Police Command Post Chevrolet 454 Weiand Manifold, Crane Cam, Gibson Exhaust | |||
|
| Powered by Social Strata | Page 1 2 3 4 |
| Please Wait. Your request is being processed... |
This website is dedicated to the Barth Custom Coach, their owners and those who admire this American made, quality crafted, motor coach.
We are committed to the history, preservation and restoration of the Barth Custom Coach.
We are committed to the history, preservation and restoration of the Barth Custom Coach.