Go to... | Start A New Topic | Search | Notify | Tools | Reply To This Topic |
| A VW toad for Steve VW | Login now/Join our community |
 3/23 3/23 |
Congrats on completion, question: 3 inches of snow and no test drive with the VW? Back in the day that was my commute to evening college in the '58 bus. I think it was a 1958, reduction gears on the axles,36hp engine and pull cable for reserve tank when the engine died for lack of fuel. Oh the glory of youth and poverty! | |||
|

Official Barth Junkie |
Oh it would love the snow! With the traction and ground clearance they are hard to stop. I have a whopping 60 hp on tap! (I just refuse to indulge in the salt bath process if possible, not to mention it doesn't have heat... 20 degrees here today) 9708-M0037-37MM-01 "98" Monarch 37 Spartan MM, 6 spd Allison Cummins 8.3 325+ hp | |||
|
| 3/23 |
I don't ever remember being warm. I did install a masonite panel with a plexiglass window behind the front seat. I could get to work without my coffee freezing! Once coming home from college at a stop light there was a sports car next to me, a Fiat 650?, this would be 68,69. A drag challenge was issued, not knowing the car was as under powered as the bus I was sure of winning 1st gear. As it turned out we were even until the next light and still under the speed limit! | |||
|
3/11 |
Fiat 850 Spyder - had one! Picked the engine up like a bag in the trunk and rebuilt it on the top of a 55 gallon steel barrel. Could not get out of its own way, but cheap and ran forever. Had an 8 gallon gas tank. 1993 32' Regency Wide Body, 4 speed Allison Trans, Front Entry door, Diamond Plate aluminum roof & 1981 Euro 22' w Chevy 350 engine and TH 400 tranny | |||
|
| Official Barth Junkie |
Well it appears the gearbox change was worth the trouble. Went for a test drive today. We had a couple days of upper 30's and rain so the roads were just wet. The gearbox differential whine is gone! At speeds around 28 or 56 mph the old trans was louder than the engine and road noise. The newer trans has almost no whine at any speed. A bit stiff shifting but it was cold today. 1st and 2nd gear synchromesh are not robust but will be better when warm. Overall, a great improvement over the original and worth the exchange effort. Now to get it packed up for the ride to Hillsborough! Have Barth, will travel 9708-M0037-37MM-01 "98" Monarch 37 Spartan MM, 6 spd Allison Cummins 8.3 325+ hp | |||
|
| Official Barth Junkie |
Made it to Florida, loaded to the gills. Unpacked the bikes, grill, neighbor's golf clubs, and several tubs of tools and parts. I had a new clutch cable to install and a new power brake booster ready. Since my neighbor here is flying west for Christmas I will have his car for a spare while he is gone next week. I planned to install those items while I had his car handy if needed. Enter the (tiny) turd fairy... The day after I removed the new clutch cable from the VW I went to Home Depot and as I rolled into the parking lot the old clutch cable broke. At least it was sunny and 75. Called my neighbor, told him where to find the cable. He brought it over and I swapped it in the HD parking lot. No big deal really but it just couldn't wait another few days. The working fuel gauge is great to have. After the brake booster I will get back to door seals and paint prep. Meanwhile we are rolling along just fine. Life is good. Have Barth, will travel 9708-M0037-37MM-01 "98" Monarch 37 Spartan MM, 6 spd Allison Cummins 8.3 325+ hp | |||
|
| 5/10 |
https://www.motor1.com/news/29...tom-camper-sale/amp/ Just in case you are bored in the Florida sunshine 1999 Bluebird Custom 33' 8.3 Cummins diesel pusher Former owner 1989 Barth Regal 25' | |||
|
| Official Barth Junkie |
Looks like a pretty good conversion job. Still pretty small but it is much bigger than the usual! (It would look even better pulling a Barth trailer!) I put new outside mirrors and door handles on mine today. The door locks did not work and the original mirrors were really bad. I am still pleased at how available and cheap the parts are. One door handle is $24, two for $30! Mirrors were about $30 each. Try that for any domestic 47 yr old car! New carburetor $68, new drive axles $65 each (includes both new CV joints) set of FOUR cylinders with fitted pistons, rings and pins, $200 total! Complete gasket set $20. The heads were cracked, complete (new, not reconditioned) heads (new valves, springs, etc) were a bit pricey but only $150 each. I have most of the mechanical and all the electrical work done, I will start on interior and paint work soon. I have several coach projects underway as well. Gottta love the warm Florida weather! 9708-M0037-37MM-01 "98" Monarch 37 Spartan MM, 6 spd Allison Cummins 8.3 325+ hp | |||
|
| 3/22 |
Sure rub it it. BRRRRRRRRRRRRRRRRRRRRRR Dana & Lynn 1997 38ft Monarch front entry Spartan Mountain Master Chassis Cummins 8.3 325hp Allison MD-3060 6 speed 22.5 11R Cummins Factory Exhaust Brake 8000 watt Quiet Diesel Generator 9608-M0022-38MI-4C Christened Midnight 1972 22ft Christened Camp Barth | |||
|
| Official Barth Junkie |
Dana I would never do that! 9708-M0037-37MM-01 "98" Monarch 37 Spartan MM, 6 spd Allison Cummins 8.3 325+ hp | |||
|
| Official Barth Junkie |
I finally finished the last of the road worthy stuff. Engine and trans are done, all four corrner brakes and lines were done but brakes were weak. The power brake booster was shot. Unlike typical cars mounted on the firewall, it is under the drivers seat. I replaced it yesterday morning while it was still cool out. (Got up to 83 yesterday!) 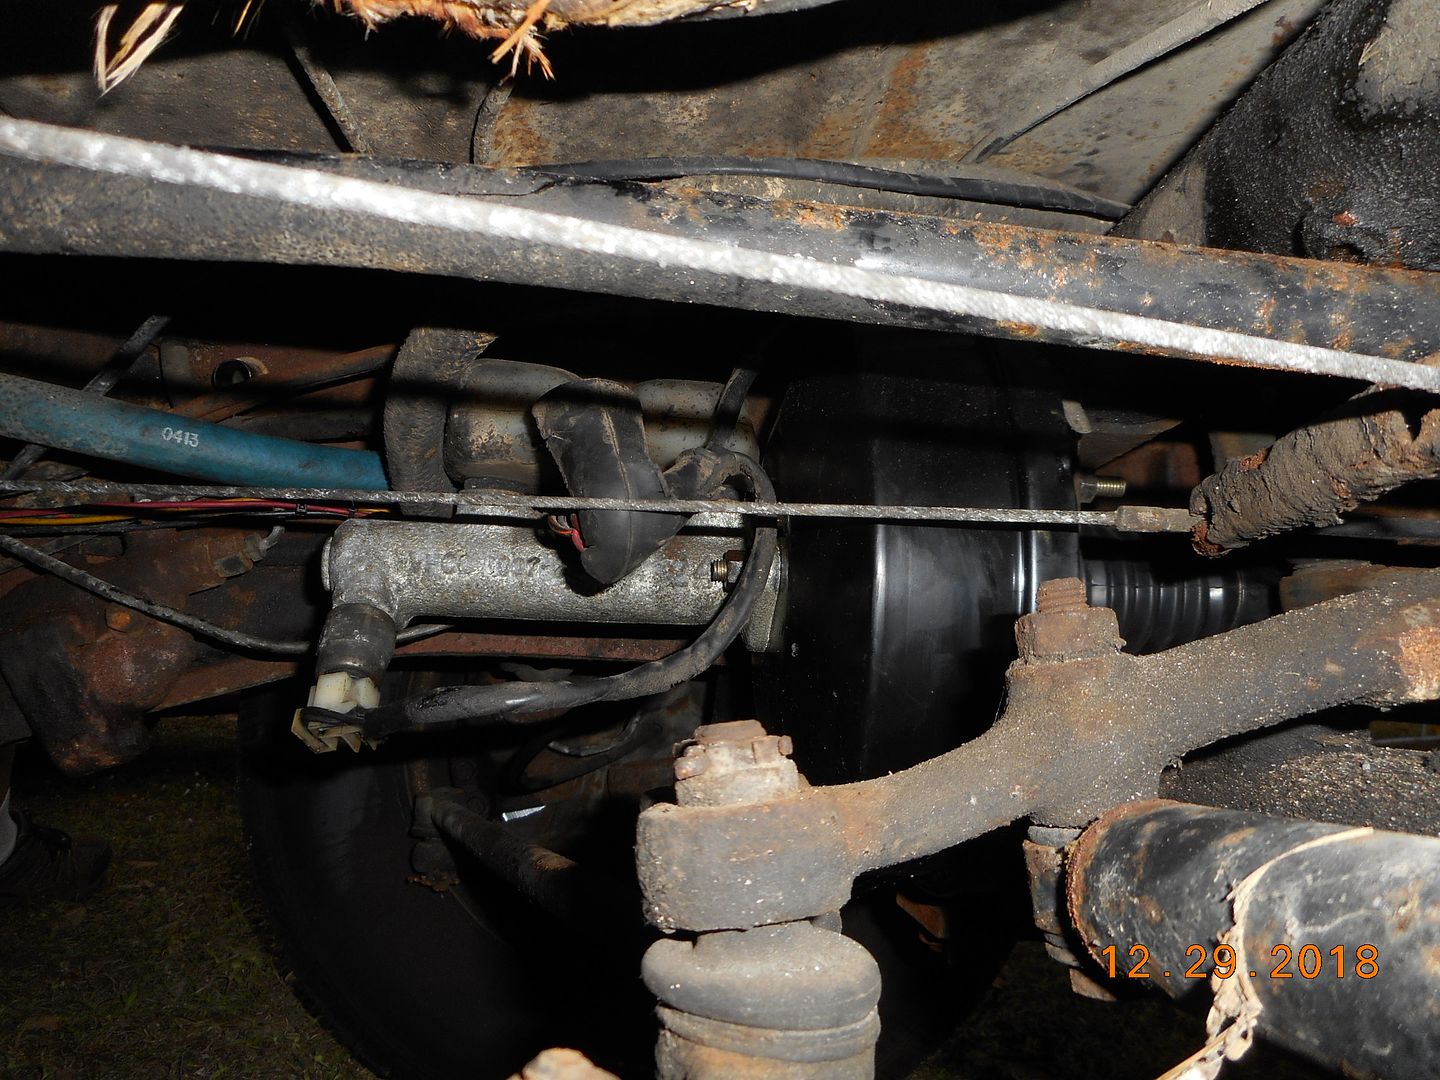 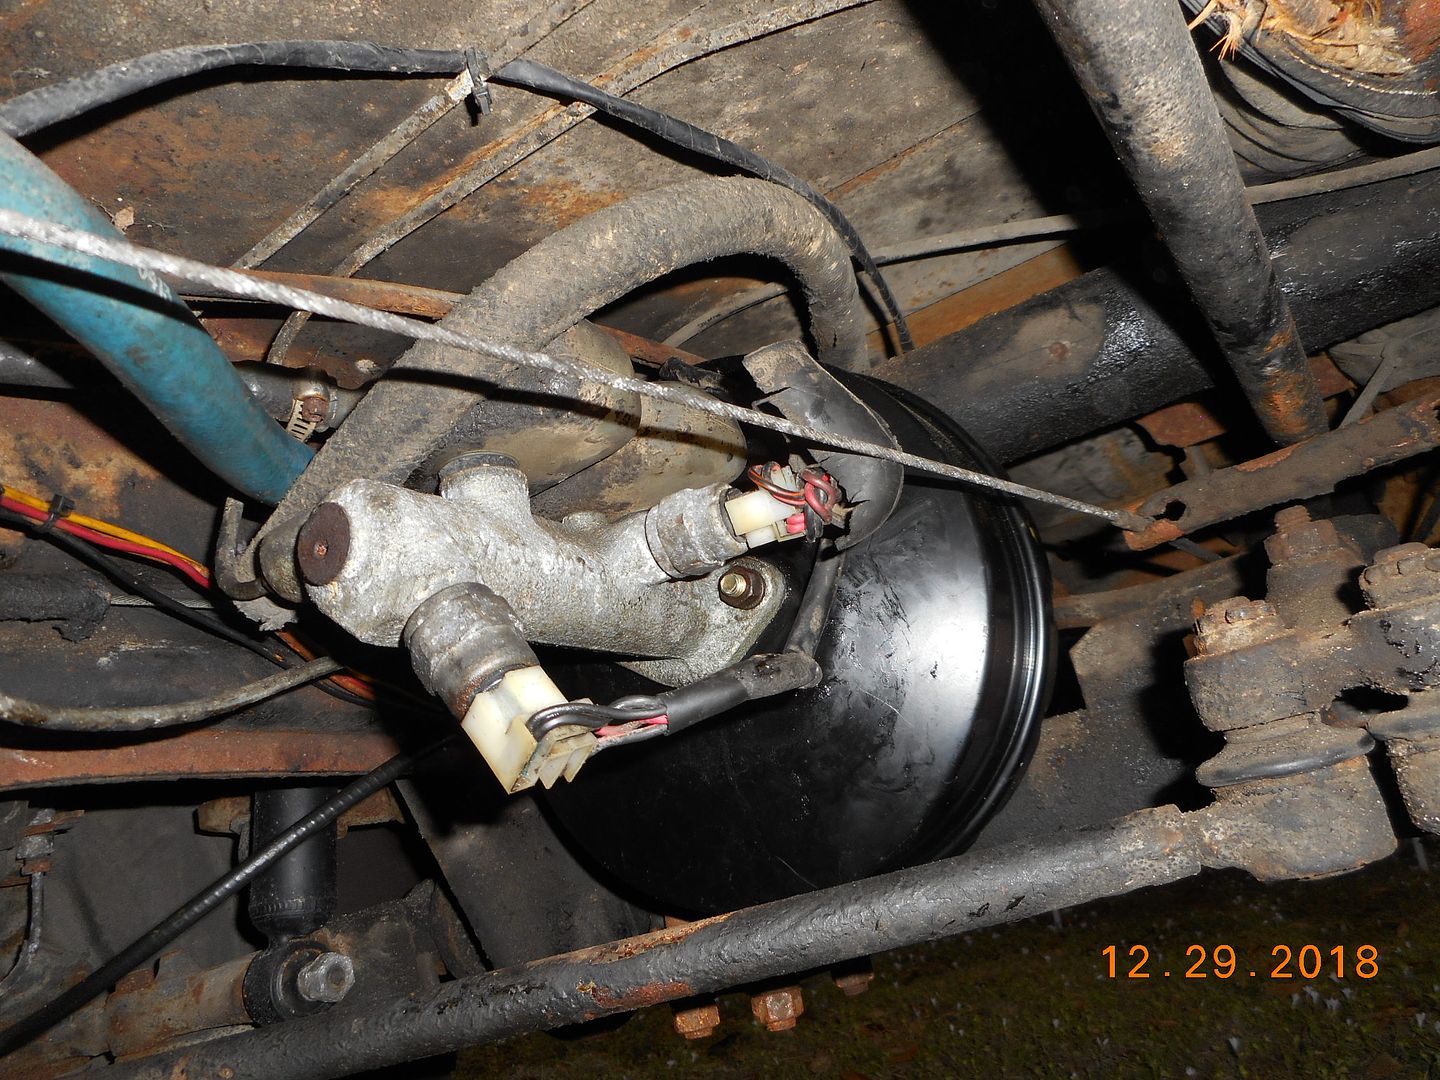 Brakes work great now. Next jobs will be door seal and beginning paint prep. A nice surprise visit from Danny and Suzy on their way to the Arcadia music fest. We will visit them in Venice soon. Always good to see Barth friends! Have Barth, will travel 9708-M0037-37MM-01 "98" Monarch 37 Spartan MM, 6 spd Allison Cummins 8.3 325+ hp | |||
|
| 3/23 |
Rub it in Steve, it is the Christmas season, naughty or nice applies 1971 24 ft Barth Continental P30 chassis 350 engine | |||
|
| Official Barth Junkie |
Since I got back from Florida I have been picking away at projects, some on the VW. I finally got around to installing new seals on both front doors. All four doors are now done. (I can go through the car wash now without leaking! Spray paint too!) I repaired the left and right front floor pans, they were full of rust pinholes and some finger sized. I epoxy laminated some heavy fiberglass mat over the areas. Put in a bubble layer for sound, and new rubber mat. New front kick panels and the area will be finished for now.  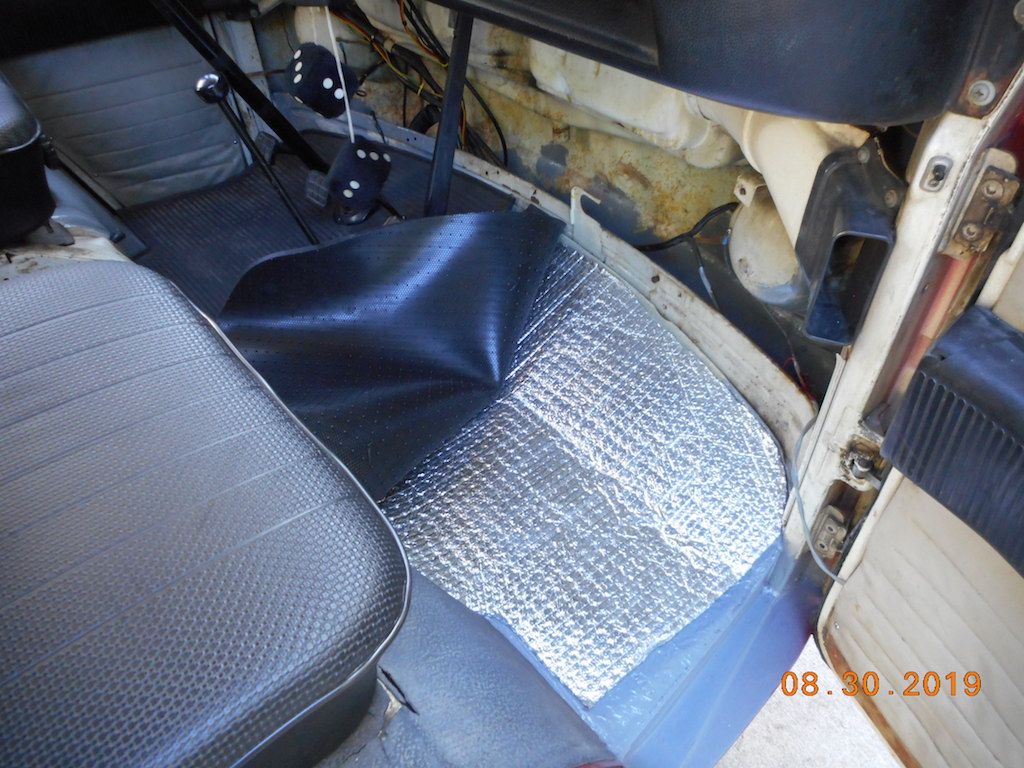  A note on Materials: When laminating to metal always use marine type two part epoxy! The catalyzed polyester resins (ie bondo) do not stick to metal as well as the true epoxies. Polyester tends to be more brittle and has more long term shrinkage. Both types of resin do not stand UV exposure well and must be painted for long term exterior use. I use fiberglass fabmat for thick layups. It has random mat on one side and woven fabric on the other. I lay the material mat side down on a piece of plastic. Saturate with resin using a brush. Wet the area to be covered, then peel the mat off the plastic and lay it on the surface. By keeping the fabric woven side up the brush will not smear the fibers as much. For a really smooth finish, use a layer of plastic sheet to smooth the surface of the fabric. For thinner skin type patches I use 6 inch woven fabric Dynel cloth tape. Dynel is somewhat more flexible than glass fiber and abrasion resistant. You can hang it on a wetted surface and saturate it through with a brush. Will conform to corners, etc. well. Examples: Mat, showing both sides, and tape 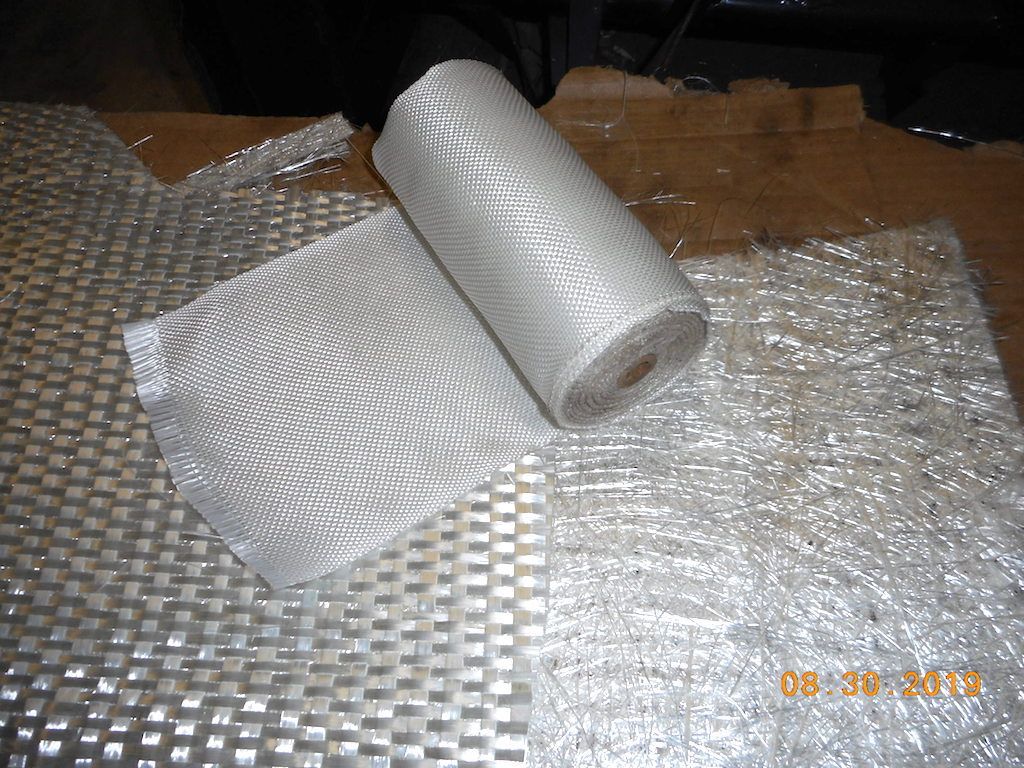 Meanwhile I was grinding off the peeling paint on the roof. Many layers.. Decided it was a good time to straighten and paint the white bumpers. When I removed the bumpers I discovered more holes and corrosion than I had expected. Much of the front had been replaced due to crash damage, long ago. The repair work was not the best. I have a rusty seam all along the bottom panel. 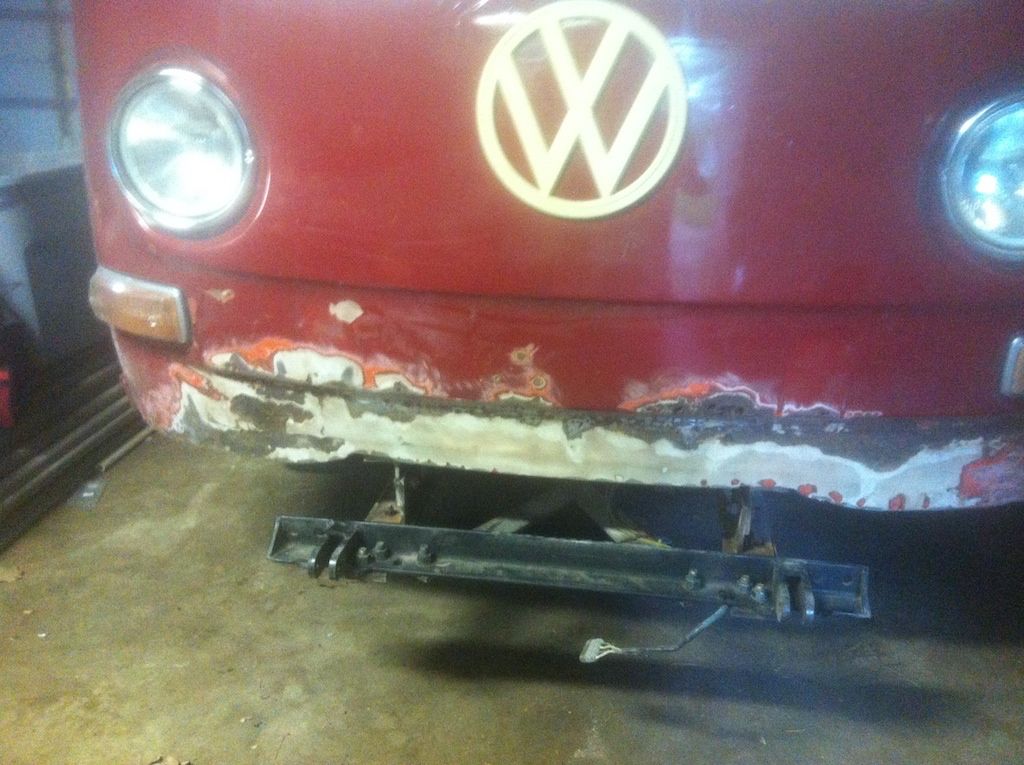 Dana says it looks like a case of "meth mouth!" I sidetracked for some body work. Ground down a TON of body filler, got down to metal. Repaired the perforated bottom seam from inside first with strips of mat, then two layers of Dynel cloth outside to cover and tie together. 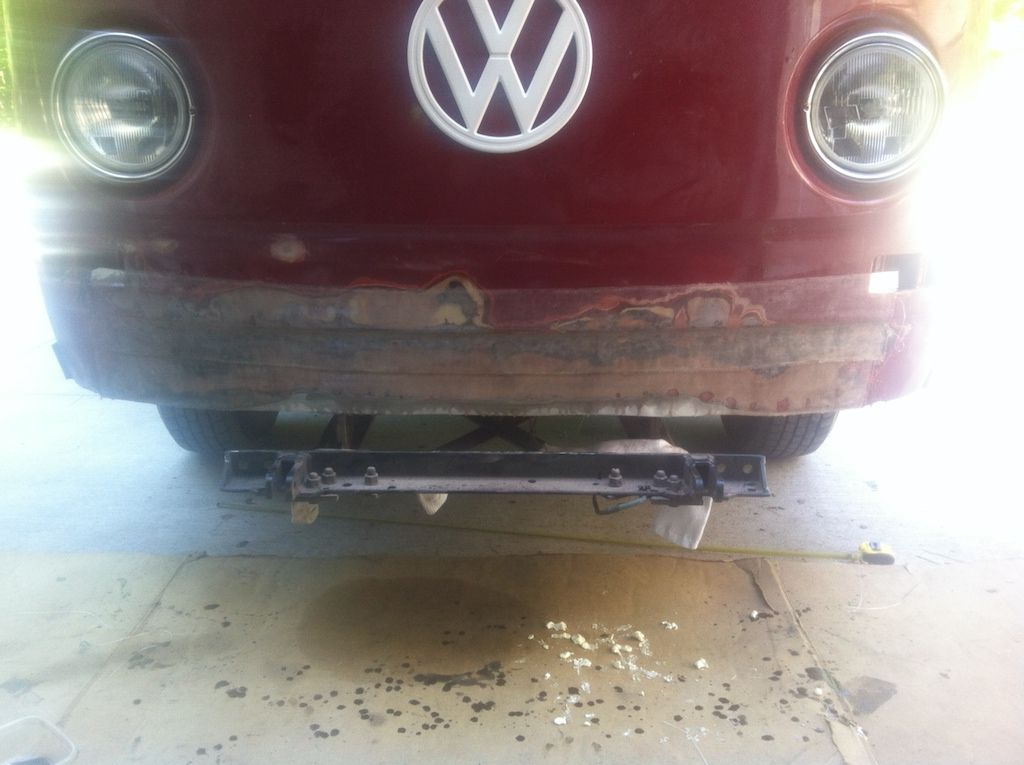 Trimmed the edges 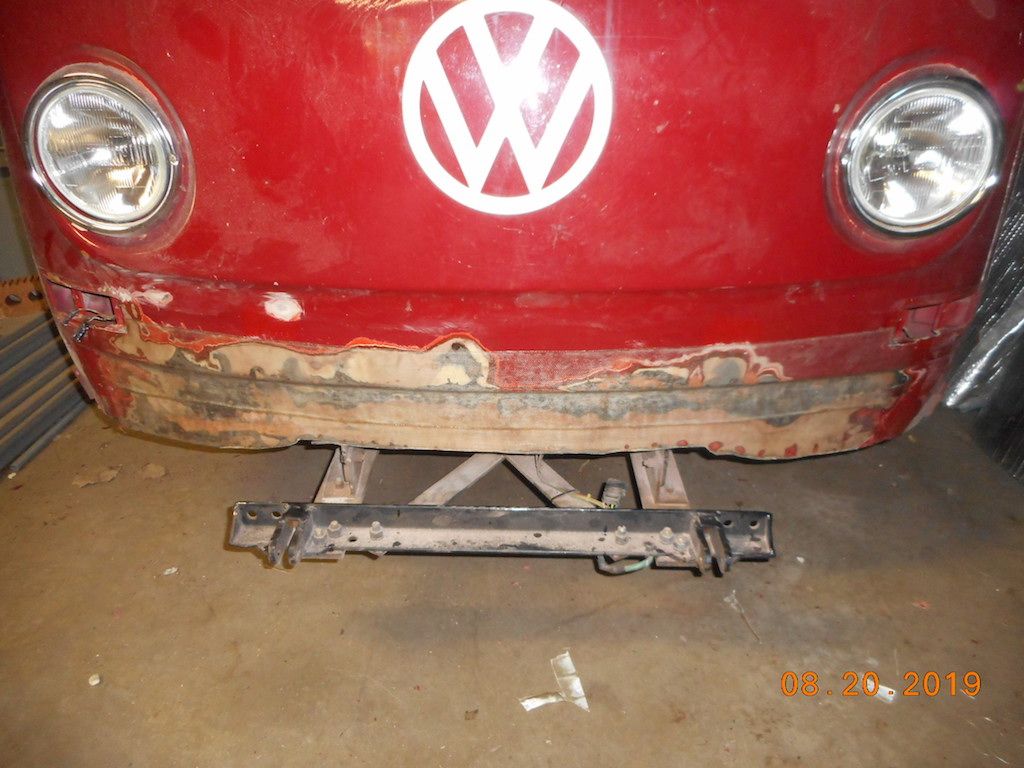 Finally got to the bumper. Got it and the brackets straight and level. Ready for paint. 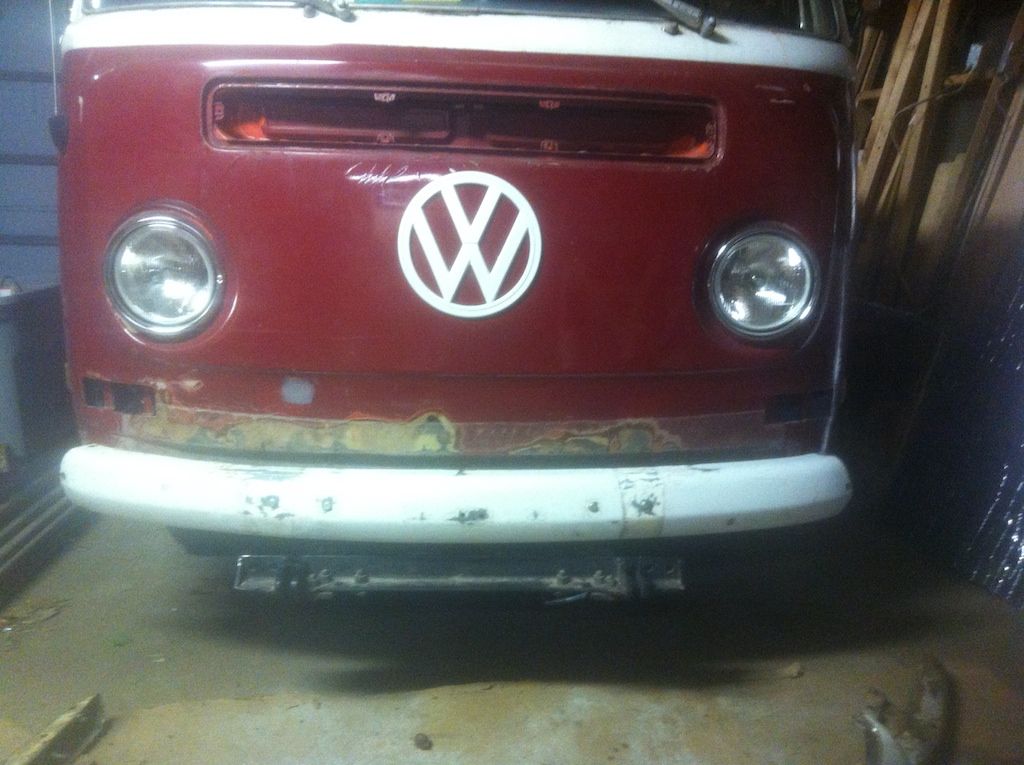 I did very minimal filler work. I will do that when I get to the final paint job. Found some spray that matches well enough for now. Installed the turn signals. 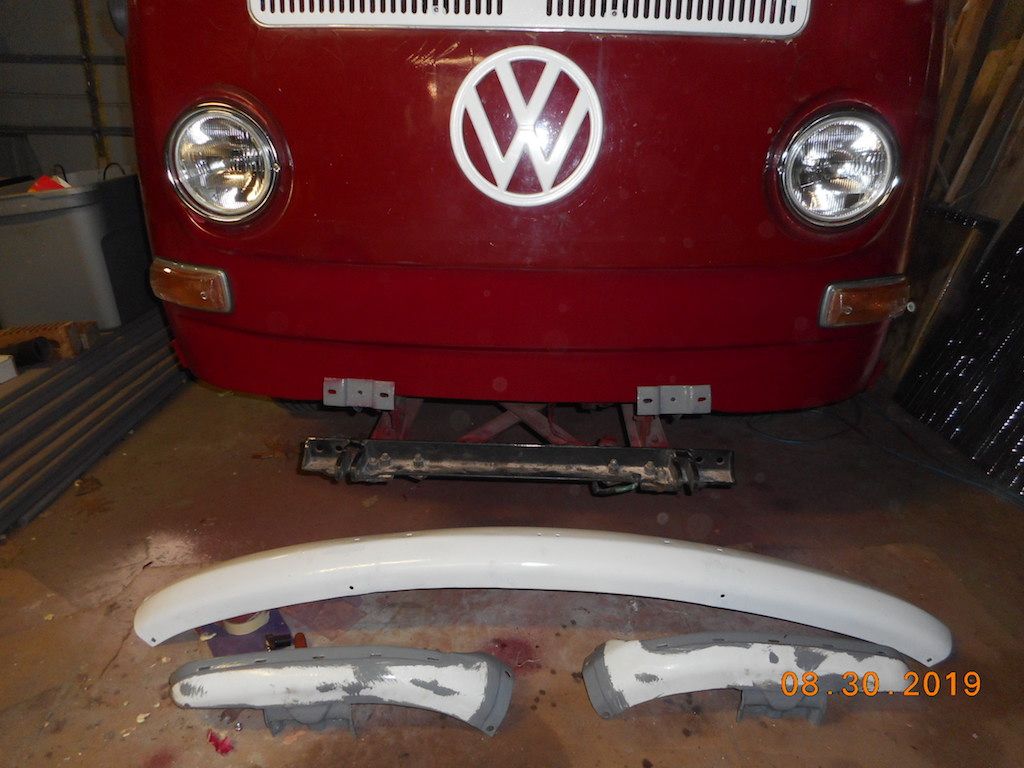 I also resprayed the white VW emblem and the vent above. A couple more coats and the bumper will be ready to hang. Still need to paint the white roof. (Maybe Anvil 400?) Meanwhile, back to work on the Monarch hydraulic cooling fan... 9708-M0037-37MM-01 "98" Monarch 37 Spartan MM, 6 spd Allison Cummins 8.3 325+ hp | |||
|
| 3/23 |
The ole VW Van will be the pride of your Florida Campground, love your work!!!! I have always been told, if you do not weld in new floor pans they will just continue to corrode away, It would be great to prove old schoolers wrong, will be curious how it looks in a few years!!! 1971 24 ft Barth Continental P30 chassis 350 engine | |||
|
| Official Barth Junkie |
The biggest trick is to completely embed the rusted metal, ie cover both sides. A layer on one side only, no matter how well applied, will still allow corrosion on the other side. If both sides are covered it will last. In this case, the corrosion in the floor pan and the bottom of the front panel were both symptoms of a still existing problem. The bottom edge of the winshield leaks. The water ended up on the floor and at the bottom of the front panel. To make things worse, someone had stuffed fiberglass insulation in the nose. This water under the floor mats and in the insulation never dried out. Both areas were corroded from the inside out. The under side of the floor had no corrosion showing except where the holes had perforated from above. For this reason I decided I did not have to laminate over the bottom side. I put a piece of plywood under the floor below the patch. The plywood had some towel padding and a layer of plastic sheet on top. I pushed the plywood up to the floor with a jack. The towel pushed the plastic snug to the floor. When I laminated above, resin leaked through any holes but was held there by the plastic sheet. Epoxy on both sides that way. I will paint and undercoat the bottom later. On the front nosecone, since the holes were large and spread out, I decided to do the inside patch first. I duct taped over the holes from the outside (several layers) to preserve the shape and minimize need for outside finishing. I laid strips of saturated fabmat inside along the bottom 2 inches of the panel. Just poked the strips in and tucked them into the bottom seam with my fingers (gloves of course) No further work needed inside, but later I did smear a little paint on the areas that didn't get epoxied. The panel is very rigid again, 1/8 to 1/4 inch of laminate behind it. Meanwhile, pulled the duct tape off, some light sanding on the outside and I applied 2 strips of the Dynel tape over the area, overlapped where the rust line was. I made no attempt to fill any dents. The filler does not adhere to the base as well as the epoxy. If it lets go, the whole layer goes with it. I put the epoxy down first. Later the filler can be used and will stay put. In this case I will leave that to the final paint job. Meanwhile the holes are gone, the rust is covered in, the bumper is painted and straight. I painted the roof and rear bumper. After a few final body patches, I will consider the body paint. 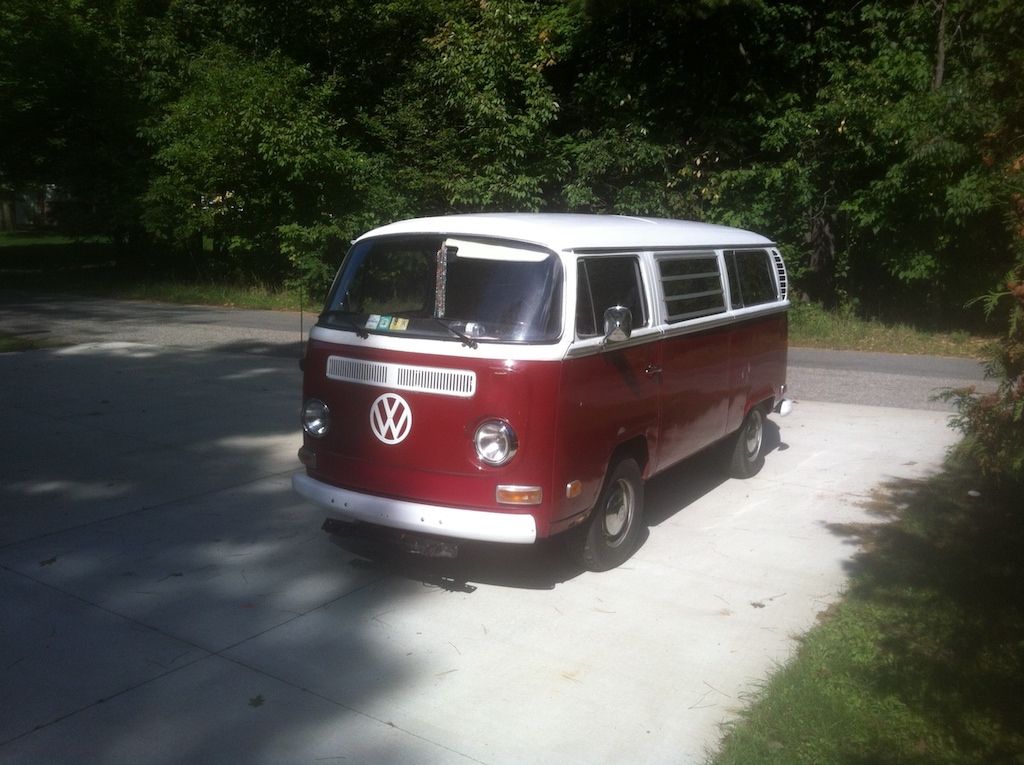 9708-M0037-37MM-01 "98" Monarch 37 Spartan MM, 6 spd Allison Cummins 8.3 325+ hp | |||
|
| Powered by Social Strata | Page 1 ... 9 10 11 12 13 14 |
| Please Wait. Your request is being processed... |
This website is dedicated to the Barth Custom Coach, their owners and those who admire this American made, quality crafted, motor coach.
We are committed to the history, preservation and restoration of the Barth Custom Coach.
We are committed to the history, preservation and restoration of the Barth Custom Coach.