Page 1 2
Go to...  | Start A New Topic  | Search  | Notify  | Tools  | Reply To This Topic  |  |
 9/09 9/09 |
I would like to place jack stands under our Regency and would like to know if anyone has good data as to where the best locations would be. The chassis is an IC2242. Lance & Sue Walton Previous owner of a 1993 38ft Regency Cummins 6CTA8.3 300HP Allison MD3060 Transmission Spartan Chassis Loveland, CO | ||
|
Captain Doom |
They are best placed under the axles, as far outboard as they can fit. The real issue will be finding a strong-enough surface to use them. Rusty '94 28' Breakaway: MilSpec AMG 6.5L TD 230HP Nelson and Chester, not-spoiled Golden Retrievers Sometimes I think we're alone in the universe, and sometimes I think we're not. In either case the idea is quite staggering. - Arthur C. Clarke It was a woman who drove me to drink, and I've been searching thirty years to find her and thank her - W. C. Fields | |||
|
 |
Axles? I've got no use for them! 1985 Regency 35' 8.2T Detriot Diesel / Allison other toys - a bunch of old Porsches, a GT350 and a '65 mustang convertible. | |||
|
I use a 1ft. X 2ft. X 1/2 inch steel plate under each of my 20 ton air/hydraulic jacks when working on my bus. Plates are a little heavy but work well. | ||||
|
 1/11 1/11 |
Make sure that your jack stands are at least 12ton each. I like to get under with jack down air up and stands AT least that way I would feel safe . front or rear that is what I do not say it is safe.I could only find 12ton and only have two.I use them by the wheels where there is a solid place are solid lenny lenny and judy 32', Regency, Cummins 8.3L, Spartan Chassis, 1992 Tag# 9112 0158 32RS 1B | |||
|
 9/09 9/09 |
I just returned from Northern Tool. I purchased 1 set of two jack stands with a combined weight limit of 12 tons and one set with a limit of six tons. I will use the 12 tons for the rear and the 6 tons for the front of my Regency. Thanks for the advice. Lance & Sue Walton Previous owner of a 1993 38ft Regency Cummins 6CTA8.3 300HP Allison MD3060 Transmission Spartan Chassis Loveland, CO | |||
|
FKA: noble97monarch 3/12 3/12 |
Rusty brought this up earlier, what surface will the jacks be sitting on? Jack stands will focus all the weight that is normally spread across the contact patch of all the tires. I would think only thick concrete or ledge would stand up to the pressure. As concrete gets stronger over time, new concrete may not be strong enough. Corey  Formerly: 1997 Barth Monarch Now: 2000 BlueBird Wanderlodge 43' LXi Millennium Edition DD Series 60 500HP 3 stage Jake, Overbuilt bike lift with R1200GS BMW, followed by 2011 Jeep Wrangler Unlimited, “I haven’t been everywhere, but it’s on my list.” | |||
|
 9/09 9/09 |
The surface is a 6 inch concrete pad laid seven weeks ago. It is fiber mesh concrete with wire mesh in the bottom and two 5/8 inch rebar laid length wise along the length of the pad. The wire mesh was placed on saddles and after the concrete was poured and tamped to remove air it was pulled back up into the pad. The RV is currently on the four HWH jacks setting on 2 x 12 x 2 feet wood slats. Going on that I am thinking that the jack stands should do okay if also placed on the same type of slats. Does this all sound plausible to y'all? Lance & Sue Walton Previous owner of a 1993 38ft Regency Cummins 6CTA8.3 300HP Allison MD3060 Transmission Spartan Chassis Loveland, CO | |||
|
FKA: noble97monarch 3/12 3/12 |
I think as long as you use the slats you are OK.  Formerly: 1997 Barth Monarch Now: 2000 BlueBird Wanderlodge 43' LXi Millennium Edition DD Series 60 500HP 3 stage Jake, Overbuilt bike lift with R1200GS BMW, followed by 2011 Jeep Wrangler Unlimited, “I haven’t been everywhere, but it’s on my list.” | |||
|
 3/11 3/11 |
The most important element of any paving is the sub-base - the supporting ground under the concrete. In road and highway design the sub-grade must be cleaned of all organic material (leaves, roots and grasses) to a depth of 6 to 18 inches in order to provide the support necessary to carry the loads. The normal procedure is to excavate about 18 inches and tamp (or use a vibrator) to compact the natural ground to what is defined as 98 Proctor, or 98% of the density of undisturbed soil. You can rent such machines but do not use the flat bottom ones that look like a sled. These spread the impact rather than actually compact the material. A device called a Sheep's Foot is used to prepare pavement sub grade. After compaction you replace 6 to 12 inches of the excavated soil with sub-grade material- basically a combination of four different size rock mixed so that the larger (3/8") diameter rock will be held in place by smaller pieces. This is also compacted to form the foundation for the actual pavement - the concrete. Rebar is laid on 12 to 24 inch center spacing, and if necessary tied together with wire to add pieces for the length exceeding 20 or 40 foot runs. Each junction is tied with soft steel wire. Saddles are placed under the assembly to place it in the center of the thickness of the final pad. Welded wire mesh is uncesssary in pavement and is normally used on patios, sidewalks and light loaded slabs as a substitute for the rebar. Concrete is then poured in to the framed area with the rebar already in place being careful not to step on the bar. An electric vibrator is inserted and it removes the entrapped air and provides a slick surface as the water in the mix rises to the surface. This is done as little as possible so as not to create any puddles or significant water sheen as this will crack later. After the pad or pavement is poured a stiff broom is pulled across the surface to prevent a slick surface that will cause falls or skids when wet, and a saw cut or trowel line is made on 8 to 12 foot intervals along the length of the pour (from side to side) to provide crack control. This forces the concrete to crack in a pre-designed manner rather than random small surface cracking "spider webs", because all concrete cracks as it shrinks while curing. Concrete reaches its 98% cure strength in about 30 days, if not admixtures are included to speed the cure rate. A six inch thick pad, at least as wide as the tires, built this way will support well over 3,000-5,000 pounds per square inch, well above the weight of any coach. Even for relatively small pours it is better to do your preparation, set your forms and base and lay all the rebar and then get a few friends (or subcontract to a small concrete finishing company (here we have many small predominantly Mexican companies that work in new subdivisions pouring driveways and sidewalks that you can locate by driving around your town during the early part of the day) and let them do them pour and finishing. Concrete companies will deliver partial loads to you for about the same cost as a full load (recently about $75 per cubic yard). While this may be regarded as overkill for a small ramp, the importance of the sub-base and the strength of the concrete is critical for longevity. For comparison purposes we recently did a 12 by 40 foot pad and driveway from the back yard to the street on the side of our lot using the above techniques and spent less than $3,000. We now have a "patio" with power of 30 and 50 amp service if we don't have the coach in place or if we decide to sell the home sometime in the future. I know this is more than most people want to do but it is important to realize just how the pavement functions - it will be no better or stronger than the supporting base under it. 1993 32' Regency Wide Body, 4 speed Allison Trans, Front Entry door, Diamond Plate aluminum roof & 1981 Euro 22' w Chevy 350 engine and TH 400 tranny | |||
|
 9/09 9/09 |
This is a 15 by 40 foot pad done by a licensed contractor. All necessary compacting, form work etc. was performed correctly. My wife and I have experience in construction and ensured that all was done properly. There are the required control cuts in the pad as well. I do have some additional thoughts however. My intent is not to use the stands to support the RV. What I want to do is to have the stands available in case the leveling jack(s) fail or for any other reason the coach starts to lower by itself. This has happened to many automobile as well as RV owners in the past. I fully intend to have all wheels installed and in contact with the concrete. I will also have the leveling jacks extended to keep the coach at traveling height. With this in mind I feel that placing the jack stands under the axles will be of no value for safety. When the coach is lowered while on the wheels it does get very low to the ground. Having stands under the axles will provide no protection against the coach lowering to that level. My plan is to put the stands under the chassis barely in contact with it. If they do need to support the weight of that corner due to an accidental lowering of the RV then they will be there to do so. If the chassis suffers some harm I would much rather that than a crushed body. I also am not doing any major work underneath. I only wish to occasionally inspect airlines, hoses, etc. Any time spent under the coach will be minimal at best. With this in mind what are your suggestions? Lance & Sue Walton Previous owner of a 1993 38ft Regency Cummins 6CTA8.3 300HP Allison MD3060 Transmission Spartan Chassis Loveland, CO | |||
|
 3/11 3/11 |
My coach has had the air suspension worked on twice in the alst two years to replace lines and connections that shrink over time. It still settles when unattended for a week or more. This does no harm, in fact it makes entering easier. I have not found a way to prevent this and the coach sitting on the frame does not appear to cause any problems. The reason it settles is the accessory air pressure bleeds off so one other approach is to connect a small compressor to the service port in the main electrical panel comaprtment (on mine under the drivers window). There are three quick disconnect ports that feed the front brakes, rear brakes and the accessories. You can connect directly to the port and start the compressor to see which one starts to raise the coach. If you have a pressure gauge the brakes will have a minimum of 70 psi at their ports while the accessory will be lower, perhaps in the 20 to 40 range. Most compressors can produce 125 psi and have internal pressure shutoff switches and it will run until the pressure is at whatever level you select. Then it should shut off and run only intermittently to keep it at 125 psi. The maintenance method for these lines is to squirt soap on each connection until you find the one or more that produce bubbles. After supporting the coach you can pull the line out of the connector and you will see a "ring" around the line at the point it is squeezed onto the internal seal. This is the place where shrinkage occurs and by cutting off just sbove that point you get a new line to replace. There will be plenty of slack in the lines so I don't think you will have to worry about making it too short. This works for a while and after about a year some other one will start the process all over. I just let it sit on the frame bumpers and when we start it up it takes about ten minutes to reach full pressure. Our mechanic tells me this is normal and that even new large trucks have this bleed down after sitting and they have no perfect solution. 1993 32' Regency Wide Body, 4 speed Allison Trans, Front Entry door, Diamond Plate aluminum roof & 1981 Euro 22' w Chevy 350 engine and TH 400 tranny | |||
|
FKA: noble97monarch 3/12 3/12 |
My coach also bleeds down over a day or two. I can hear it hissing out of one of the "thingees" under the front hood. Several things come to mind from Tom's previous post; 1) I wonder which is best for the air bags, constant full inflation or constant deflation? or...for that matter, constant semi-inflation?, 2) a concern with using a small compressor for constant pressure maintenance would be the increased generation of moisture into the system, 3) my 97 Monarch does not have any air controls in the electrical bay, anyone know where the disconnects might be, or if they exist on my year coach? Corey  Formerly: 1997 Barth Monarch Now: 2000 BlueBird Wanderlodge 43' LXi Millennium Edition DD Series 60 500HP 3 stage Jake, Overbuilt bike lift with R1200GS BMW, followed by 2011 Jeep Wrangler Unlimited, “I haven’t been everywhere, but it’s on my list.” | |||
|
 |
Is there anyone out there who has an air suspension that does not leak down over time? You cannot hear any noise of escaping air from ours but it does go down after a few days. The rear sags first, but obviously has a lot more weight on it than the front so that is reasonable. It does not seem to have any effect on the system's operation that we can see. Don't forget that you are supposed to dump the air suspension BEFORE operating the stabilizers anyway so I don't think it hurts anything. Depending on where we are parked I will dump air to lower the coach just to make it easier to get in and out. Don 1990 Regency 34' Cummins 6CTA 8.3 240hp Spartan Chassis, 4 speed Allison MT643 | |||
|
 3/11 3/11 |
Here is a picture of mine the connectors are noted at the bottom. 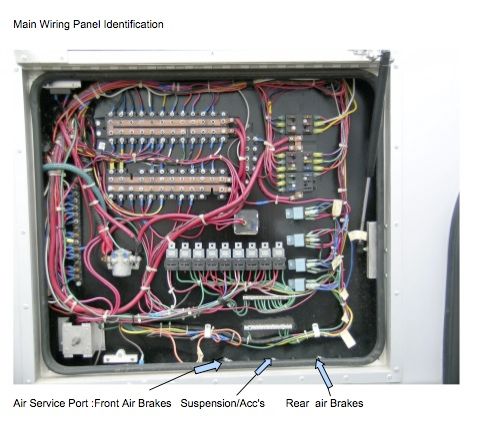 1993 32' Regency Wide Body, 4 speed Allison Trans, Front Entry door, Diamond Plate aluminum roof & 1981 Euro 22' w Chevy 350 engine and TH 400 tranny | |||
|
| Powered by Social Strata | Page 1 2 |
| Please Wait. Your request is being processed... |
|
This website is dedicated to the Barth Custom Coach, their owners and those who admire this American made, quality crafted, motor coach.
We are committed to the history, preservation and restoration of the Barth Custom Coach.
We are committed to the history, preservation and restoration of the Barth Custom Coach.

