
Go to... | Start A New Topic | Search | Notify | Tools | Reply To This Topic |
| Interior Ceiling Replacement | Login now/Join our community |
I have done mutiple searches, but have not found the answer(s) I am looking for. So, I am throwing this out there for some direction, either personal experience or where on this site I might find some advice.... My winter project is going to be removing the one leather(?) ceiling panel that is coming apart and replacing it. This happens to be the ceiling panel that is right behind the front AC unit and extends to the kitchen area. To do this properly, you need to take down the overhead cabinets. I found a couple of suggestions on this site that said to work "around" the overhead cabinets, but I do not think that is the way I want to handle this. Mainly because I am not sure how I would "cut out" along all the cabinet surfaces and replace just a portion of the area. So, my first question is, has anybody removed and re-installed their overhead cabinets. If so, how difficult is this? I do not think the removal will be terrible, but I'm concerned about putting them back in. I would want them to be just as they are right now after re-installing them, with no creaks and rattles and firmly in place. The second question is what to expect when I take down the ceiling panel itself. Anybody take one down? I have the leather(?) ceiling and am not sure how it is actually installed. I see the "strips" between the different ceiling panels, but do not know if they are the only things holding it in place. But the leather(?) is coming separated at the joint where it is stapled on the edge. The material is also very stiff from a previous water leak, so it needs to be replaced and not just re-stretched. Soooooo, any input would be appreciated as I get ready to take on what seems to be a MAJOR project. Bruce 9303 3855 33BS 1B Bruce & Kathleen 1993 33' Front Entrance Breakaway 230HP Cummins 5.9, Allison 6 speed, Spartan Chassis, Nicely Optioned | |||
|

I have the same issue but mine if a vinyl ceiling material. I have an edge where the material has pulled out from the seam but not yet away from the seam, some staples came with the pull and have been removed so it still looks OK but is becoming noticable and the panel is very hard because of and was caused by a water leak around the A/C or solar panel. I don't think there is a way to do this without removing the cabinets which would be a VERY big job. I am contemplating doing this in a couple of years when supposedly I will have more time. I will also add the needed insulation at that time, mine is NOT well insulated above these panels! I believe the panels are a sandwich of materials, from the inside: covering-leather or vinyl later of foam backing 1/4 inch luan (plywood) silver bubble plastic insulation air space outer skin If and when you do this take lots of pictures please! Ed 94 30' Breakaway #3864 30-BS-6B side entry New Cummins 5.9L, 375+ HP Allison 6 speed Spartan chassis K9DVC Tankless water heater | ||||
|
"Host" of Barthmobile.com 1/19 1/19 |
Here is a picture of my material that is like Ed's coach. 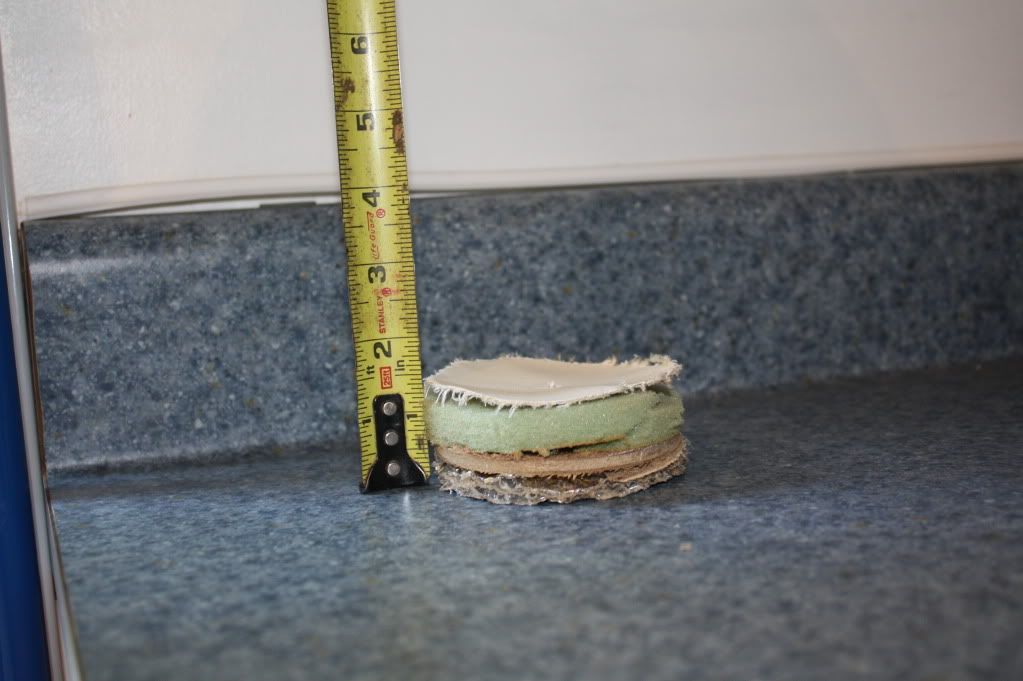 I cut this section out of my closet. 
| |||||||||||||||
| ||||||||||||||||

| First Month Member |
That burger looks a little green. Better throw it out. . 84 30T PeeThirty-Something, 502 powered | |||
|
Well, I got the meeting of the minds here this past weekend and we discussed the repair of the ceiling. I may be taking a different approach to this problem temporarily, as time, finances and the weather this year may not allow me to do it to the extent that I want to. So, it may just be a "patch" job this year. Time will tell. If I go through with the total replacement, I will keep all informed. If not, I will have indoor storage next year and hopefully will be better equipped to tackle this job. Wonder who would do something like this on a "contracted out" basis and how much it would cost????? My buddies agree, very BIG and RISKY project because all of the cabinets have to come down. 9303 3855 33BS 1B Bruce & Kathleen 1993 33' Front Entrance Breakaway 230HP Cummins 5.9, Allison 6 speed, Spartan Chassis, Nicely Optioned | ||||
|
| First Month Member |
Maybe the cabinets don't have to come down. How about cutting the ceiling out right up to the cabinet face with an offset blade on a Dremel Multi Max? You could epoxy a depth stop on the blade to avoid cutting the aluminum structure, and protect the face of the cabinet with shim stock. Then put the new one up with some cove molding? Or, if the new ceiling is vinyl, a big welt or windlace made of the same material. I'm not sure your coach is like mine, but take a look and see if it would work. . 84 30T PeeThirty-Something, 502 powered | |||
|
| The Old Man and No Barth |
Several years ago, a member reported stripping the fabric off his ceiling panels without taking the cabinets down. He made patterns of the area to be re-covered, cut rigid backing material (probably door skins, they're about 1/8" thick, & weigh little) to the shape of the patterns, glued fabric to them, then screwed the fabric covered panels to the old ceiling paneling. My ceiling was beautiful, velour-like material, & not soiled or discolored, but it sagged because the foam backing had deteriorated. I removed the seam strips, pulled the fabric loose on one edge, stretched it flat, folded the loose edge under, stapled it, & replaced the seam strips. It puckered in the corners, but stayed reasonably flat otherwise. Not as neat as a full replacement, but hardly noticeable without close inspection, & it did remove nearly all of the sag. | |||
|
| 8/11 |
I agree with Bill h., you may want to consider cutting around the cabinets and using some sort of "filler" to make the edge esthetically pleasing. Billy & Helen Thibodeaux Retired from Billy Thibodeaux's Premiere RV, Inc. Scott, LA 70583 I-10 Exit 97 The Farm is near Duson, LA I-10 Exit 92 then N 1 mile on right Three Full 50 Amp RV Hookups ! billynhelen@me.com Data Tag: 9404-3908-36XI-2C 1994 Sovereign 36' Widebody on Spartan IC (Mountain Master Lite) Chassis. Powered by Cummins ISL9-450 Onan 8,000 Quiet Diesel Genset Toad: 2018 Chevy Colorado ZR2 Diesel with M&G Car Brake  | |||
|
Thanks for the input! I had thought about the idea of just tightening the vinyl (is that what it actually is? looks like leather), but I know that ceiling panel got wet and really needs to be replaced. I read the old forum about the guy who made the "inserts" and attached them to the existing ceiling panel. But, same story as above...the panel needs to be replaced. I am seriously considering your thought, Bill H. It is what I had originally thought, but then started to get the feeling that I wasn't doing the job correctly. To do it correctly meant taking down the cabinets so I called in my carpenter and mechanic friends to get their opinion. Their thought---lots of work with no guarantee that we can get it back together the same with no squeaks or rattles. Speaking of that.....I believe the way these cabinets are installed is one of the reasons they are so quiet. Think about it, they have built in padding between them and their connection to the roof. Anyway, I'll keep you posted as I move along. Input is ALWAYS welcome and helpful! 9303 3855 33BS 1B Bruce & Kathleen 1993 33' Front Entrance Breakaway 230HP Cummins 5.9, Allison 6 speed, Spartan Chassis, Nicely Optioned | ||||
|
| First Month Member |
Don't know how bad your sag is, but have you considered putting in some buttons covered with matching material to hold up the material? You could use a nice pattern and it would look OEM. If nothing else, you would have a pattern of little sags instead of one big, baggy sag. A quilted effect, perhaps. Upholstery shops have the buttons. You cover them with the vinyl and they snap over regular snap fasteners. Your Barth might already have some here and there. Mine used them, for example, to cover the screws that hold up the batten strips that cover the edges of the ceiling boards. . 84 30T PeeThirty-Something, 502 powered | |||
|
| The Old Man and No Barth |
Bruce & Kathleen, what is "correct," is what works for you. If you're doing a restoration, "correct," is restoring everything to original condition or better. "Correct," for a useful, but aged artifact (my view of what a Barth is) is what satisfies you. | |||
|
| First Month Member |
Heck, a lot of Barth owners don't even know what model they have. Since All Barths are Different, anyway, the term "correct" is, like the queen in Alice in Wonderland, whatever the owner says it is. Barths are, after all, custom coaches. . 84 30T PeeThirty-Something, 502 powered | |||
|
Thanks guys!!!!!!!!!!! Now I just need a tad bit warmer weather than teens with a wind chill in single digits. But heck, it's still warmer than quite a few other places in this country..... 9303 3855 33BS 1B Bruce & Kathleen 1993 33' Front Entrance Breakaway 230HP Cummins 5.9, Allison 6 speed, Spartan Chassis, Nicely Optioned | ||||
|
I have done this job several times on other makes of coaches but never a Barth. The steps are as follows. 1)use painters tape or a light tape that will not peel any finish off of the cabinets, run it along the top edge of the cabinets to protect them. 2) loosen all screws that run into ceiling at the face of the cabinetes to loosen them up. MAKE SURE NOT TO REMOVE ANY OTHER SCREW OR THE CABINET MAY FALL! 3)using a razor nife cut at a 45 degree agle along the facia of the cabinets. ( reason for the tape on the cabinets) 4)peel the vinyl or leather loose trimming and cutting as needed. try not to tear or streatch the old material too much. 4) use a wire brush to remove old padding material or by what ever other means remove as much as possible. (another reason for the tape on the cabinets) 5)if you didnt get the material with the padding already attached now is the time to do so, when doing this dont get either material too wet or it will blead through! I usualy use benders adhesive, lay the vinyl face down, roll the foam up into a roll, start spraying both surfaces with adhesive, spray aprox. 2 feet,let set till tacky working from the the middle of 1 end slowly lay foam onto vinyl aplying a smooth even pressure, do not poke it will leave dimples!!!!! let set till completely dry before next step 6)put new material face up, take the old peice of material lay it out on the new and cut a pattern aprox 1 inch larger on all sides, to ease in cutting use a marker to mark pattern on new material, next take a straight edge lay on line flatten and cut with razor, this should keep it from snagging. I use industrial scissors. 6)next take the new pattern into the unit spray the ceiling and material in the center of the both, have someone help you set it into place, !!!!REMEMBER EVEN PRESSURE NO POKING OR IT WILL DIMPLE!!!! sometimes I use cardboard in a 1' square to press it into place now start at the end of a cabinet and glue the material into place as close to the edges as you can get (another reason for the tape on the cabinets) 7)now using a dull putty knife tuck the edges of the new material under the facia of the cabinets you may have to remove some of the screws you loosened to get material into place, make sure its tight and in pplace around the entire perimeter 8) screw cabinets back into place reattach ceiling mouldings and enjoy the material should never sag because it is held in place by the cabinets hope this helps!!!!! if I run into a ceiling material job I will try to post some pics | ||||
|
| Powered by Social Strata |
| Please Wait. Your request is being processed... |
This website is dedicated to the Barth Custom Coach, their owners and those who admire this American made, quality crafted, motor coach.
We are committed to the history, preservation and restoration of the Barth Custom Coach.
We are committed to the history, preservation and restoration of the Barth Custom Coach.