Go to... | Start A New Topic | Search | Notify | Tools | Reply To This Topic |
| Cedar Wall Remodel | Login now/Join our community |
 4/10 4/10 |
Here's a link to 46 pics of a little project we've been doing on our coach. As you can see the walls had been exposed to a considerable amount of water for what appears to be quite some time. There is a significant advantage to an aluminum constructed coach, however when water leaks into these it runs into a "trough" part of the aluminum frame that can hold water for a long period of time until it either evaporates (which isn't easy to do because it is sealed inside the foil insulation and the aluminum skin) and/or it will eventually leak out around the #4x1" screws (used to fasten the lauan board to the side frame) that are thru and into the bottom of the trough holding this water and continually seeping into the lauan board walls via the screw. The screws eventually rust, further opening the hole, and even more water seeps into the lauan. When the water is in the lauan it really is virtually trapped in an air tight environment as the lauan is sandwiched between the foil insulation (which is bubble plastic in between an outer layer of foil on both sides and adhered to the lauan on the inside) and the vinyl-cloth type of wallpaper which is also adhered to the lauan on the outside. As you can imagine the lauan delaminates and rots. The windows and seams did not show any sign of recent leaking as this had been stopped prior to us getting the coach this spring so any moisture was residual from quite some time ago (I still redid the seal on a couple of the windows) and we found water in between the vinyl side pockets and the cushioned vinyl sides next to the passenger chair. This area actually had only a slight sign of water getting in, the lauan was all solid and not stained so to find actual water inbetween the two pieces absolutely shocked us, it had to have been there since last fall or even ealier than that. As you probably are guessing.........yes there was a musty smell in the coach; mostly in the cab area....... it was the vinyl sides on the coach next to the driver and passenger chairs.......whew! After we removed these water soaked panels the musty smell left with them. Vinyl will really hold an odor. Surprisingly the floor did not show any damage from all of this neglect and the ceiling is solid as well. If all goes as we hope the ceiling will be covered next (we refer to it as droopy drawers) as the foam is shot. 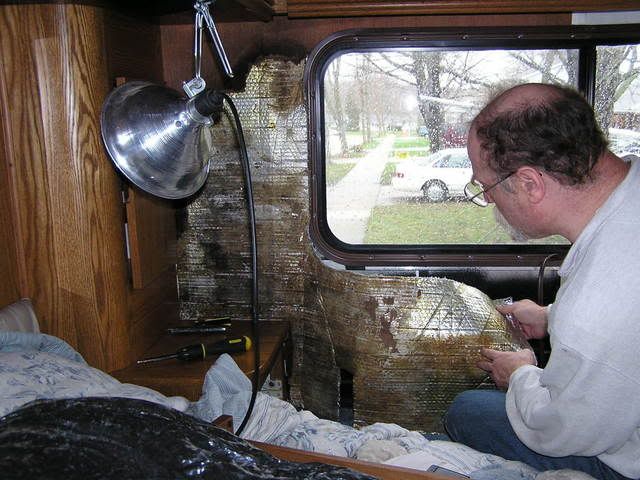 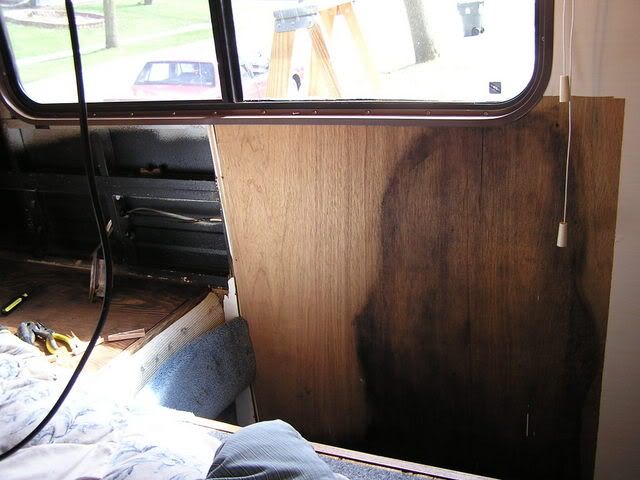 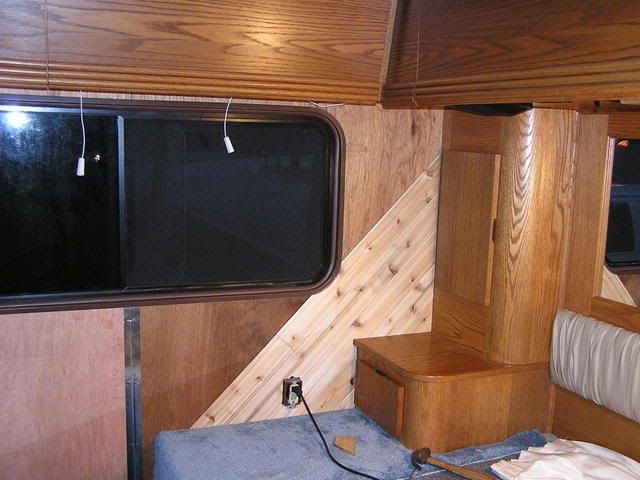 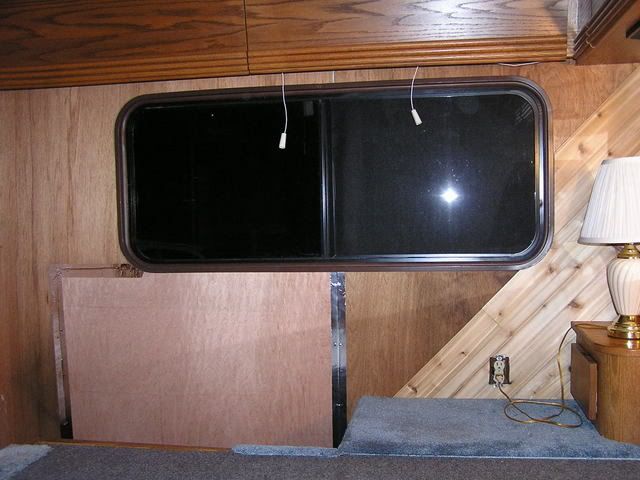 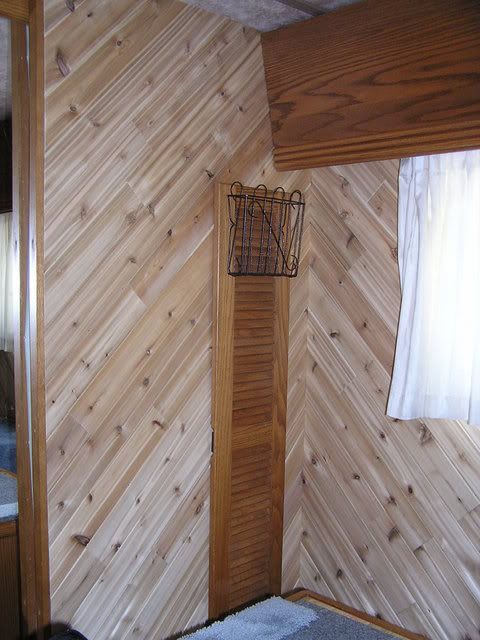 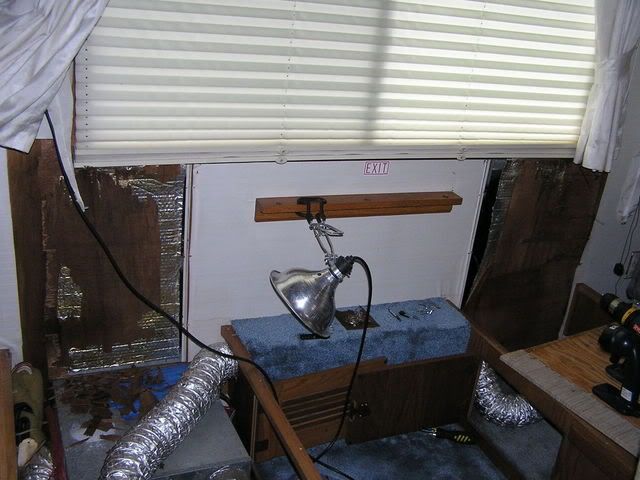 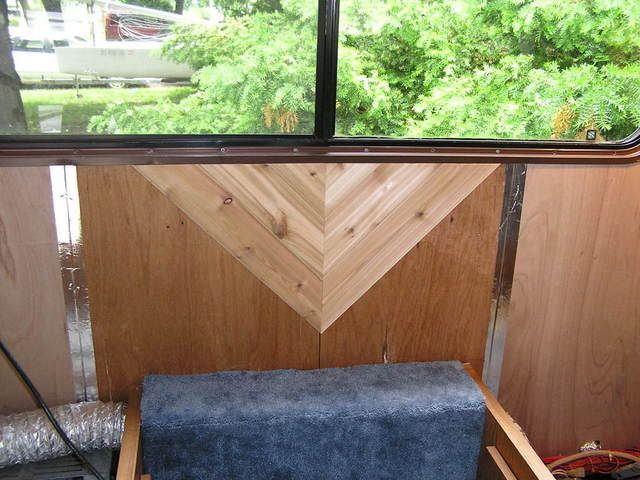 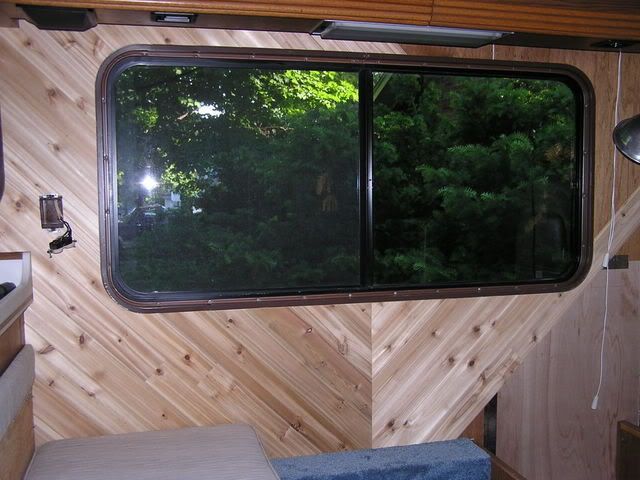 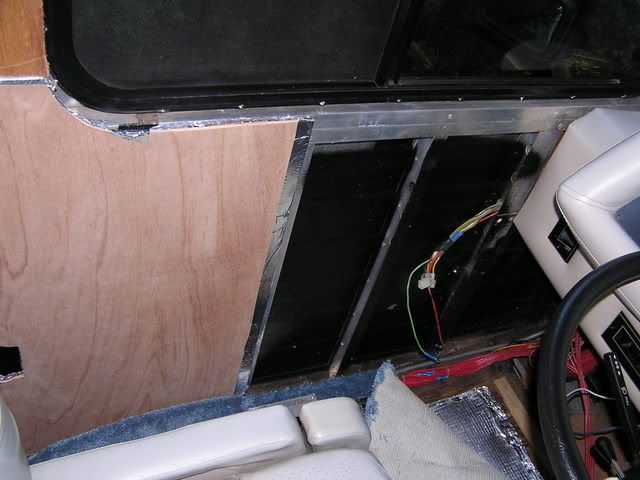 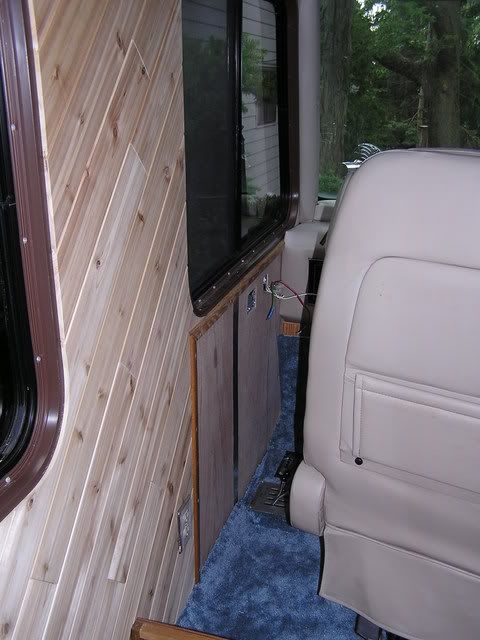 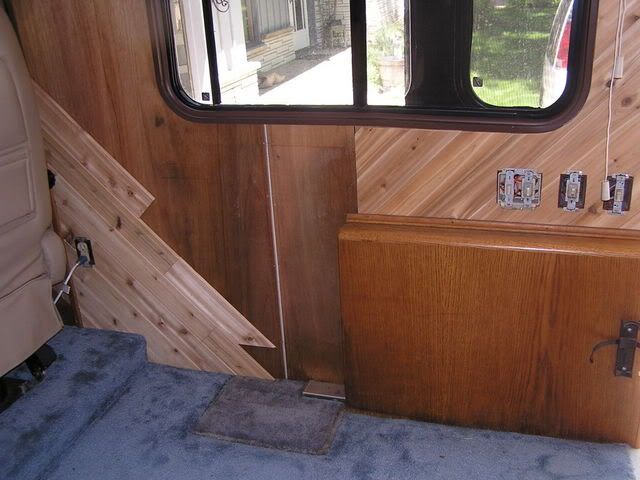 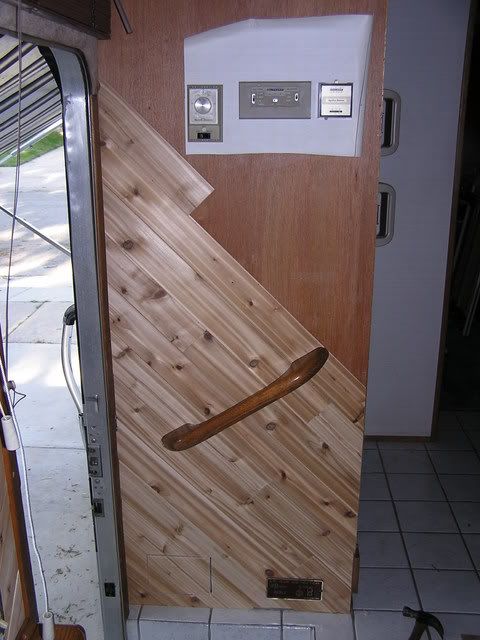  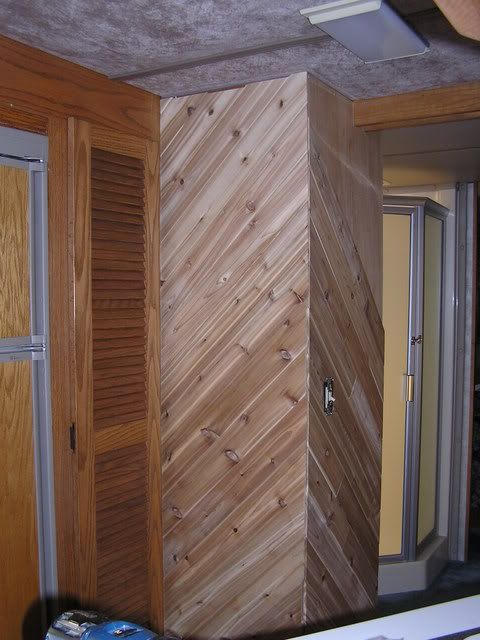 http://s188.photobucket.com/albums/z230/steve_wi/coachwalls/ 1990 32' Regency Spartan Chassis Cummins CTA8.3 Allison 4 speed | ||
|

RE: Cedar My coach bedroom has a cedar-lined clothes closet, and next to it is a TV enclosure: about 18" square, atop drawers, next to the ceiling. I removed the never-watched TV and lined the box, including it's ceiling, with cedar; left the front open and use it for my foldable clothing (not including skivvies, of course). It looks great, cost little, was amazingly easy to install -thin tongue and groove rose cedar boards- and matches the closet. Since it has no door, it's ceiling is visible to the room and adds a touch of je ne sais quoi decoration. The cedar paneling came in a box with instructions (Home Depot) and I highly recommend it for remodeling. "You are what you drive" - Clint Eastwood | ||||
|
Glassnose Aficionado |
Quite a few years back we used to install a cedar chipboard product in closets. Supposedly you could empty the closet and sand the panelling every couple years to keep it fresh. Due to it's present popularity, I don't think it worked very well. 79 Barth Classic | |||
|
| 4/10 |
The cedar we used on the walls in the pics is western red cedar. I have white michigan cedar I'll use for the trim. I actually did line the closet tonight but I used aromatic eastern cedar. As you mentioned Danny, I have never seen the type of cedar you mentioned. Tomorrow I hope to plan out the ceiling using the western cedar same as we put on the walls. I am debating if I need to remove the fabric/foam headliner prior to fastening the cedar on the ceiling. I may just leave it on and cover over it as there is nothing wrong other than it sags in one spot and everywhere you touch it leaves a permanent imprint. If I leave it on I think it would increase the R-value as well as keep things a little quieter than if I removed it. 1990 32' Regency Spartan Chassis Cummins CTA8.3 Allison 4 speed | |||
|
| The Old Man and No Barth |
FWIW, my headliner sagged throughout. I prepared to replace it, but found I could remove the plastic retaining strips, stretch it flat, staple it, & replace the strips. It wrinkles in the corners, but is better than sagging. I hated the thought of removing the lovely fabric. It ain't like a total replacement, but it's livable. | |||
|
 |
oleroy, very nice work! I usually do something each winter to Barth. You may have inspired my next project, but it looks like a BIG project. I am a newbie of this rv paneling stuff, and I am not sure what I might be getting into. A couple of Qs. It looks like, from the pictures that you removed old vinyl covered luan, replacing it with new luan, then put the cedar over that. Is that correct? Apparently luan is under current the overhead cabinets and window frames. How did you deal with that, especially the window frames? And how is the cedar attached? Thanks for the info! | |||
|
| The Old Man and No Barth |
garryp - Steve WI is doing the cedar paneling, & indeed it looks like a superb job. I'm of an advanced age that puts me out of the major restoration projects category, & into doing what works to keep things going. Somewhere on this site is a discussion about re-doing ceilings. Someone reported they had stripped the fabric from the luan, made patterns of each ceiling panel, cut new panels outside the coach, fastened new fabric on them lying flat on a workbench, & fastened them onto the existing luan substrate. Probably used door skin material for the new panels, but I forgot how he fastened them. As I recall, he removed his overhead cabinets & covered the entire ceiling. I was about to embark on a similar project, though I was going to cut my new panels to fit around the cabinets because I'd have to work on it in the storage yard. I tried to re-cement the fabric on one ceiling panel, & failed, but in the process, discovered I could remove nearly all the sag by stretching the fabric, stapling it tight, & re-fastening the cross bands. As noted, it wrinkles in the corners. Not as neat as doing the job right, but effective in reducing the sag to almost nil, & retaining the beautiful ceiling fabric. | |||
|
|
OK, Steve, I'll bounce the Q back to you. See 2 posts back. Sorry, I did not scroll far back enough to pick up the correct author. And to repeat, looks great. Olroy, I understand your comment about condition. Right now I am boondocked in a mountain 'bowl', mountains every where, and my back/hip/leg sciatica is killing me, so cannot enjoy. I think my solar installation did me in. Gonna hang out a few days to see if I start home or otherwise. | |||
|
| 4/10 |
Thanks for the compliments! I finished covering the ceiling tonight; so all that's left to be done is the trim. It looks like, from the pictures that you removed old vinyl covered luan, replacing it with new luan, then put the cedar over that. Is that correct? Actually the vinyl/cloth wall covering (wallpaper) I simply peeled off of the original lauan walls (which are fastened to the aluminum frame of the coach). The lauan that I removed was for the most part under the windows and had been ruined (delaminated) from water leaks around the windows and seams, it was only those areas that I replaced with new lauan, most of the original lauan walls were left intact as they were not ruined. Once this was done I then had a solid surface (lauan plywood) to attach the cedar onto. It will depend on the exact type of original wallcovering you have in your coach as to how easy or difficult it might be to remove; the covering on mine was surprisingly easy to strip or pull off, leaving a bare lauan wall. I determined that the walls were assembled as whole 4' x 8' sheets with the foil insulation adhered to one side (back) and the vinyl/cloth wallcovering adhered to the other side (front). then they were cut to the size needed to fit in the coaches and after installed the window and electrical box openings were routed out using a panel bit. Apparently luan is under current the overhead cabinets and window frames. How did you deal with that, especially the window frames? Yes the cabinets are installed onto (over) the walls. I did not remove the cabinets. There were a number of reasons why, the most important being that I didn't want to LOL. Actually we were able to determine in all cases if the doors and drawer clearances would still be adequate if we left them in place and in fact everything was ok, including the swing-out of the overheads. The cedar is about 5/16" thick so it all worked out. From an installation standpoint it would be easier to install the cedar and then the cabinets because then you wouldn't have to figure such close tolerances around them, BUT if for instance you removed (in our case) the cabinets on either side of the bed, installed the cedar, and put those cabinets back they would not fit again because you just moved both walls in 5/16" on each side, so fitting the cedar AROUND everything was the only way to go. The window frames were removed ONLY if I had to replace the lauan as that fits underneath the frame. The cedar was carefully fit around the outside of the frame so if the window needs to be removed you can do it without ripping off all the cedar. This would be easier if you could fit the cedar under the window frame but the frames (inside to outside) fit tight together and in order to have the cedar installed and then place the frame over the cedar you would need some type of 5/16" filler between the inner and outer frame. I passed on messing with this idea, but it would obviously save a lot of time as you wouldn't have to fit each piece around the frames. And how is the cedar attached? I attached the cedar with 3/4" brads; use an air nailer. As you can see it's all at a 45 degree angles on the walls, besides looks there is a very important reason for this.........installing it this way you can not tell that the walls (on any coach) are not perfectly parallel or perpendicular to each other or to the cabinets or the windows or anything else for that matter. If you install this vertical or horizontal every little thing that doesn't line up will stick out and I don't think that any amount of trim is going to save the project from looking poor. Even if you were to start with a completely gutted interior I think it would be extremely difficult to have the lines look good. garryp- Thanks for your interest. I sympathize with your back problem. I had much the same thing for a couple decades, laid me up for weeks at a time, finally had a cortisone injection known as a LESI (Lumbar Epidermal Spinal Injection (I think that's what it stands for)), since then I haven't experienced any more than a couple days of discomfort in many years, you might want to inquire about it if no one has ever mentioned it. 1990 32' Regency Spartan Chassis Cummins CTA8.3 Allison 4 speed | |||
|
|
Steve, thanks for the detailed report. I am not good at detail work. I did replace my carpet with floating floor, but that is much more forgiving of mistakes than your cedar job! One more Q: How is the luan attached to the Al coach frame? I have what appears to be vinyl 'wallpaper', and it is basically good, except for 'wiggle-stretch' around some windows. I think that is because it was under the window frame and vibration/flex worked it in one direction, so I have wrinkles at edges at windows. Wasn't there when I bought it. Re: back. I have been through it all. meds, strange injections, cortisone epidurals, acupuncture, physical therapy, and finally surgery which was about 10 years ago. Surgery was 100% effective - until the last year, and the problem seems to be recurring. I am on the road. I think my bed needs to be firmer, and I have a firm, removed mattress at home, but I may have to buy one on the road to see if it helps. Slept on sofa last night as an experiment. I am hoping I can tease the back to useable condition so that I do not have to end my summer Odyssey early. No less pain at home than in Barth at the UT/ID border, so long as I can drive! | |||
|
| 4/10 |
The lauan plywood is attached with #4 x 1" phillips wood screws both in the wall and the ceiling. 1990 32' Regency Spartan Chassis Cummins CTA8.3 Allison 4 speed | |||
|
| Powered by Social Strata |
| Please Wait. Your request is being processed... |
This website is dedicated to the Barth Custom Coach, their owners and those who admire this American made, quality crafted, motor coach.
We are committed to the history, preservation and restoration of the Barth Custom Coach.
We are committed to the history, preservation and restoration of the Barth Custom Coach.