Go to... | Start A New Topic | Search | Notify | Tools | Reply To This Topic |
| Monarch insulation | Login now/Join our community |
Official Barth Junkie |
I finally got back to the insulation project. The center sections of the ceiling have cabinets on both sides and cannot be lowered to allow fiberglass insulation to be installed. On one side of the ceiling there are AC ducts that block access from the center. I found that 1 inch foam insulation could be cut into strips that I can install from the center, between the trusses, and push all to way to the outside wall. The foam fits above the AC ducts. The foam stays up next to the plywood roof, held in by a few short screws into the plywood. I cut strips and installed the foam into all the bays from the driver seat to the back bedroom, about 18 bays in all! I used almost all of six 4 X 8 sheets of R5 1 inch foamboard. (Only the two bays blocked in their centers by the AC and the vent fan did not get foam.) In the areas that I had already installed fiberglass the foam slid in above the glass. After the foam was installed I added more fiberglass wherever I could fit it in. I was pleased to find it was fairly easy to insert the foam panels and I could access almost every bay in the entire roof. I have installed 1 inch foam in two wall areas that I had opened. The remaining walls are my next concern. I would love to find a way to blow something into the walls. I have numerous photos I will post whenever PhotoBucket decides to work again.... 9708-M0037-37MM-01 "98" Monarch 37 Spartan MM, 6 spd Allison Cummins 8.3 325+ hp  | |||
|

I am wondering if that foam board will squeek as it rubs together as you go your merry way down the road. #1 29' 1977parted out and still alive in Barths all over the USA | ||||
|
| Official Barth Junkie |
It may make some noise although it is fairly tight to the roof. In addition, the foam is up next to the roof, with glass insulation and the ceiing panel below it. The coach is not that quiet I don't think, besides I'm half deaf anyway. 9708-M0037-37MM-01 "98" Monarch 37 Spartan MM, 6 spd Allison Cummins 8.3 325+ hp | |||
|
#1 29' 1977parted out and still alive in Barths all over the USA | ||||
|
 3/22 3/22 |
Steve were all the spacings the same through out the coach roof? Did you need the flexibility of the 1 inch to get it in or could you have used 2 inch if the ducts wouldn’t have been in the way? How far and how packed did the fiberglass insulation get? How thick of fiberglass did you use? Pretty soon you will be so thermally superior you will be able to heat with a candle and cool with an ice cube Dana & Lynn 1997 38ft Monarch front entry Spartan Mountain Master Chassis Cummins 8.3 325hp Allison MD-3060 6 speed 22.5 11R Cummins Factory Exhaust Brake 8000 watt Quiet Diesel Generator 9608-M0022-38MI-4C Christened Midnight 1972 22ft Christened Camp Barth | |||
|
| Official Barth Junkie |
Almost all of the trusses were evenly spaced at 16" centers. The space between the trusses was very close to 14 1/4" on most. I cut the strips to 14 3/16. Given my cutting quaity, they fit snug but I was able to jam them all the way to the end of each bay. When I did some of the walls, they are nominal 1 1/2 thick, but given the flanges on the ribs, 1 1/2 would need lots of trimmming. 1 1/4 would be about ideal but is not a commonly available thickness. I settled on 1 inch R5 foamboard. The roof trusses are made of 1 inch aluminum stock. They taper from about 5" in the center to just the 1 inch frame at the outside of the bay. Using the 1 inch board was ideal because I could jam it all the way to the end of the bay. I butted the foam in the center with a tight fit. Due to the curvature of the roof, the foamboard wanted to droop down a bit in the middle. I used a small screw and washer to pull each strip snug to the roof. I think using thicker than 1 inch foam would make insertion difficult and it would be harder to fit the curved roof as well. In the center section of the roof the trusses are taller. After the foam went in I stuffed each bay with R13 (3 1/2") fiberglass. I could not get all the way out due to taper of the roof space but I filled the middle 1/2 or so, about 2-3 ft from the center depending on the wires, ducts, etc. I did 18 bays plus parts of others. The front 3 feet of the coach still needs more insulation but the rest is done, except the two bays with the front AC and the center vent fan. I could not get to those side bays for foam or glass. If I remove them I could open the side of the hole and access the bays, as I did in the bathroom adjacent to the skylight. (More photos when possible.) I am tired but the job is done for the roof. I will be doing the wall cavities next, when I get access to them. I will hopefully see a major reduction in cooling load, especially when the roof is not in the shade. We shall see in Florida soon. Have Barth, will travel 9708-M0037-37MM-01 "98" Monarch 37 Spartan MM, 6 spd Allison Cummins 8.3 325+ hp | |||
|
| Official Barth Junkie |
Since my last posting I removed an 8 foot section of the inside lower wall on the passenger side below the windows. I replaced the luan laminate paneling with oak veneer plywood. Before I installed the plywood I cut pieces of 1 inch styrofoam and glued them to the inside of the aluminum skin. I shot foam around the edges and installed the new paneling. On a cold night recently, I noticed the lower metal window trim ring on the passenger side was dry and the other side was sweating with drops of condensation. 9708-M0037-37MM-01 "98" Monarch 37 Spartan MM, 6 spd Allison Cummins 8.3 325+ hp 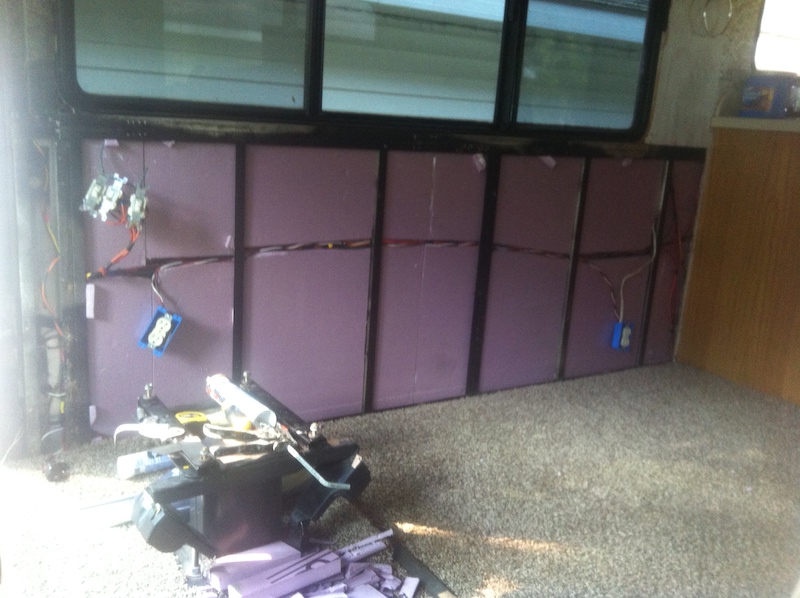 | |||
|
| Official Barth Junkie |
I did the same thing on the outside wall of the bathroom. I removed the bottom half, installed 1 inch styrofoam and oak plywood. On the top half I cut more large holes, installed foam and covered with new plastic laminate. The bathroom feels warmer too. 9708-M0037-37MM-01 "98" Monarch 37 Spartan MM, 6 spd Allison Cummins 8.3 325+ hp  | |||
|
| Official Barth Junkie |
It has been some time since I worked on any insulation. The areas I did have been very good but the bedroom heats and cools quickly since the walls are empty. On the way home from Florida I had a run in with an invisible tree and dented the top and back wall. A good excuse to uncover the wall for repair and insulation.  | |||
|
| Official Barth Junkie |
Got started by removing the cabinets to see what is there.  | |||
|
| Official Barth Junkie |
Corner is creased for sure.  | |||
|
| Official Barth Junkie |
A good excuse to uncover and insulate. Actually, I have another ulterior motive. My 86 Regal had a rear window. I always wished the Monarch had one. (You can see the invisible trees behind you!) I will pull a bit more wallboard down to the bed level. I will have to replace the top corner frame and install a window frame. Looking for some more insulation, a window frame and a good double pane window. Insulation should be no problem now!  | |||
|
| 3/23 |
Yikes Steve, big job and less than a month till the Snowta GTG! However, if anyone can do it I got my money on you!!! There is tons to do on Nose but, am considering just putting it back together, really need to repair the roof before getting started on the interior project. Need your gumption!!! 1971 24 ft Barth Continental P30 chassis 350 engine | |||
|
| Official Barth Junkie |
If I just get the top radius piece replaced it will be roadworthy. Fortunately, neither the curved center piece or the outside corner was damaged. I will just drill out rivets and remove the bent part. Straighten the top rail and new piece can be riveted in. The problem may be getting the right window. I won't cut the hole until I have exact dimensions. A bit of wrinkle work on that panel too. Depending on window size I may be able to cut out some of the bent panel then. Finding the right size, dual glass, and getting it here may be unpredictable. Soon to find out. I am looking forward to an insulated bedroom. Doing the ceiling helped a lot but the walls still get hot in the sun and cold at night. I will get the back window and the insulation installed first. With the cabinets out I will probably do the side walls soon as well. Once complete I am sure it will be more comfortable. 9708-M0037-37MM-01 "98" Monarch 37 Spartan MM, 6 spd Allison Cummins 8.3 325+ hp | |||
|
| 6/19 |
A rear window would be nice . Harold Cat Sam Miniature Schnauzer 3.8.2009 - 9.24.2021 93 30ft Breakaway 9209-3823-30BS-11B KE5WCW | |||
|
| Powered by Social Strata | Page 1 2 3 4 5 |
| Please Wait. Your request is being processed... |
This website is dedicated to the Barth Custom Coach, their owners and those who admire this American made, quality crafted, motor coach.
We are committed to the history, preservation and restoration of the Barth Custom Coach.
We are committed to the history, preservation and restoration of the Barth Custom Coach.